LG 50PM4M Owners Manual - Page 29
Screen Menu Options
 |
View all LG 50PM4M manuals
Add to My Manuals
Save this manual to your list of manuals |
Page 29 highlights
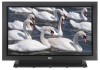
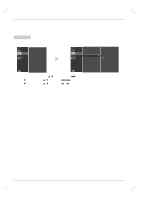
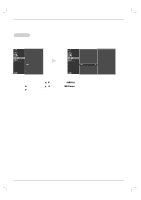
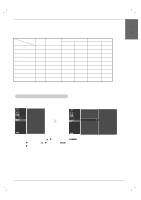
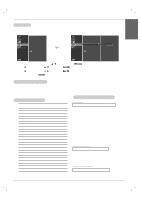
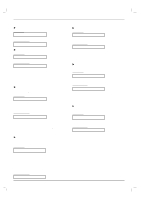
ENGLISH Screen Menu Options Operation Auto Configure - Automatically adjusts picture position and minimizes image shaking. - This function works in the following mode : RGB[PC]. PICTURE0 SOUND0 TIME0 SPECIAL0 SCREEN G Auto config. Manual config. XGA Mode ARC Reset PICTURE0 Auto config. G SOUND0 Manual config. TIME0 SPECIAL0 SCREEN0 XGA Mode ARC Reset To set Menu Prev. Menu Prev. 1. Press the MENU button and then use D / E button to select the SCREEN menu. 2. Press the G button and then use D / E button to select Auto config.. 3. Press the G button to start Auto config.. • When Auto config. has finished, OK will be shown on screen. • If the position of the image is still not correct, try Auto adjustment again. 4. If picture needs to be adjusted more after Auto adjustment in RGB (PC), you can adjust the Manual config.. 5. Press the EXIT button to save the new settings. Manual Configure - This function works in the following mode: RGB[PC], RGB[DTV], HDMI[DTV], COMPONENT[DTV] mode only - If the picture isn't clear after auto adjustment and especially if characters are still trembling, adjust the picture phase manually (RGB-PC mode only). - To correct the screen size, adjust Clock (RGB-PC mode only). PICTURE0 SOUND0 TIME0 SPECIAL0 SCREEN G Auto config. Manual config. XGA Mode ARC Reset PICTURE0 SOUND0 TIME0 SPECIAL0 SCREEN0 Auto config. Manual config. XGA Mode ARC Reset G Phase 0 Clock 0 H-Position 0 V-Position 0 Menu Prev. Menu Prev. 1. Press the MENU button and then D / E button to select the SCREEN menu. 2. Press the G button and then D / E button to select Manual config.. 3. Press the G button and then D / E button to select Phase, Clock, H-Position or V-Position. 4. Press the F / G button to make appropriate adjustments. 5. Press the EXIT button to save the new settings. Owner's Manual 29
-
 1
1 -
2
-
3
-
4
-
5
-
6
-
7
-
8
-
9
-
10
-
11
-
12
-
13
-
14
-
15
-
16
-
17
-
18
-
19
-
20
-
21
-
22
-
23
-
 24
24 -
 25
25 -
 26
26 -
 27
27 -
 28
28 -
 29
29 -
 30
30 -
 31
31 -
 32
32 -
 33
33 -
 34
34 -
35
-
36
-
37
-
38
-
39
-
40
-
41
-
42
 |
 |