LG BG-101A Service Manual - Page 17
Procedure B Continued
 |
View all LG BG-101A manuals
Add to My Manuals
Save this manual to your list of manuals |
Page 17 highlights
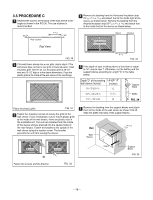
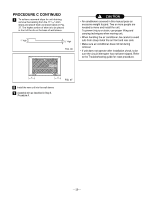
PROCEDURE B CONTINUED 6 Remove the backing from the support blocks and attach them to the inside of the wall sleeve as shown FIG 29. Slide the baffle into slots of the support blocks. Wall Wall Sleeve Front (7 3/32") Baffle Support Block FIG. 29 7 Install the new unit into the wall sleeve. 8 Assemble trim as described in Step 6, Procedure A. CAUTION • Air conditioners covered in this manual pose an excessive weight hazard. Two or more people are needed to move and install the unit. To prevent injury or strain, use proper lifting and carrying techniques when moving unit. • When handling the air conditioner, be careful to avoid cuts from sharp metal fins on front and rear coils. • Make sure air conditioner does not fall during removal. • If unit does not operate after installation check, to be sure the circuit interrupter has not been tripped. Refer to the Troubleshooting guide for reset procedure. -17-
-
 1
1 -
2
-
3
-
4
-
5
-
6
-
7
-
8
-
9
-
10
-
11
-
 12
12 -
 13
13 -
 14
14 -
 15
15 -
 16
16 -
 17
17 -
 18
18 -
 19
19 -
 20
20 -
 21
21 -
 22
22 -
23
-
24
-
25
-
26
-
27
-
28
-
29
-
30
-
31
-
32
-
33
-
34
-
35
-
36
-
37
-
38
-
39
 |
 |
