LG DH65EL Service Manual - Page 16
Housing, Assembly, Motor, Drain
 |
View all LG DH65EL manuals
Add to My Manuals
Save this manual to your list of manuals |
Page 16 highlights
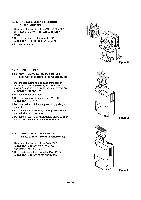
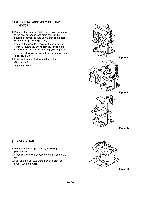
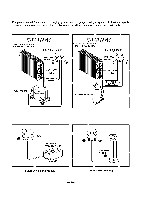
3.2.8 HOUSING ASSEMBLY, FAN AND MOTOR 1. Remove 4 screws that fasten the housing assembly to the heat exchanger and drain pan. Lift the housing assembly upward after unhooking 2 hooks on the housing. (See Figure 22) 2. Remove the screw that secures the housing and orifice. Separate the orifice from the housing after unhooking 3 hooks on the housing. (See Figure 23) 3. Turn the nut clockwise and pull out the fan carefully. (See Figure 23) 4. Unfasten 2 screws that secure the motor. (See Figure 24) 5. Separate the motor. 3.2.9 DRAIN PAN 1. Remove the housing assembly according to the procedure above. 2. Unfasten 2 screws that secure the drain pan to the base. 3. Pull the drain pan backward then lift it from the base. (See Figure 25) -16- Figure 22 Figure 23 Figure 24 Figure 25
-
 1
1 -
2
-
3
-
4
-
5
-
6
-
7
-
8
-
9
-
10
-
 11
11 -
 12
12 -
 13
13 -
 14
14 -
 15
15 -
 16
16 -
 17
17 -
 18
18 -
 19
19 -
 20
20 -
 21
21 -
22
-
23
-
24
 |
 |
