LG DLG3788W Owners Manual - Page 22
Exhaust, Dryer, Maintenance - is not drying
 |
View all LG DLG3788W manuals
Add to My Manuals
Save this manual to your list of manuals |
Page 22 highlights
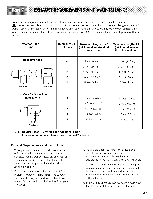
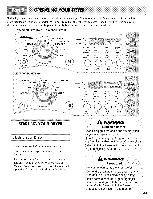
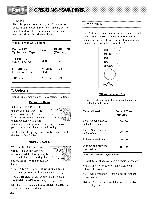
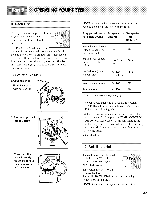
Exhaust and Dryer Maintenance Disconnect the dryer,s electric power prior to any cleaning or maintenance. 1. After one year of use, the interior and complete exhaust system of the dryer should be examined and cleaned if necessary. 2. You should inspect and clean the exhaust duct at least yearly. 3. Check the weather hoods frequently to ensure the dampers are moving freely, that the dampers are not pushed in and that nothing has been set against the dampers. 4. A qualified service person or company should be used to perform this maintenance. 5. A Flexible Metal Vent Kit, available at extra cost, can be used to exhaust the dryer when it is placed in hard to reach places. This Kit comes in two pieces, one of which is attached to the dryer and the other is attached to the wall exhaust outlet. Following attachment of the two separate pieces to the dryer and the wall, the dryer may be returned to its final position, after which the two pieces themselves can be connected. 7. Ordinarily, the dryer drum will need no care. Wipe the exterior of the dryer as required, and always immediately wipe the exterior of the dryer in the event any detergent, bleach, or other washing products is spilled on the dryer, because these products may cause permanent damage to the exterior finish of the dryer. 8. Clean the control panel with a damp cloth as necessary. Warning: spray pre-wash products may damage the finish of the control panel. 9. Please clean the lint filter either before drying each load or after drying each load. 10. Always make sure the lint filter is clean before starting a new load, because a clogged lint filter may increase drying times. 11. Annually remove the lint filter and attach it to the vacuum duct. See item #2 above. 12. Please note that the wiring diagram is provided inside the dryer control hood. Label all wires prior to disconnection when servicing the dryer, because wiring errors can cause serious injury to you and your dryer. 22 Cleaning the Lint Screen 1. Clean the lint filter either before drying each load or after drying each load. Always make sure the lint filter is clean before starting a new load, because a clogged lint filter may increase drying times. . To clean, pull the lint screen straight up and roll any lint off the screen with your fingers. Do not rinse or wash screen to remove lint, because wet lint is hard to remove. Push the lint screen firmly back into place. . Always ensure the lint screen is firmly secured before running the dryer. Running the dryer with a loose lint screen may cause overheating and damage to the dryer and articles being dried. . Some articles may shed more lint than other towels (for example, towels made of synthetic fibers and natural fibers), causing the lint screen to become congested more quickly. Remove lint from the lint screen before and after drying these articles, such as new towels. . In the event lint falls off of the lint screen and into the dryer during removal, inspect the exhaust hood and remove any lint. . Laundry detergent and fabric softener residue can build up on the lint screen, causing longer drying times. The screen is likely blocked if lint falls off the screen. In order to prevent this type of build up, and help ensure proper operation of your dryer, clean the lint screen with a nylon brush every six months or, if necessary, more frequently. The lint filter can also be washed as follows: a) After rolling the lint off of the screen with your fingers, wet both sides of the screen with hot or warm water. b) Wet a nylon brush with hot water and liquid detergent and scrub the lint screen with the brush to remove the buildup of detergent and fabric softener. c) Repeat as necessary. d) After the residue has been removed, rinse screen with hot water. e) After drying the lint screen with a clean towel, firmly replace the lint screen in your dryer.
-
 1
1 -
2
-
3
-
4
-
5
-
6
-
7
-
8
-
9
-
10
-
11
-
12
-
13
-
14
-
15
-
16
-
 17
17 -
 18
18 -
 19
19 -
 20
20 -
 21
21 -
 22
22 -
 23
23 -
 24
24 -
 25
25 -
 26
26 -
 27
27 -
28
-
29
-
30
-
31
-
32
 |
 |