LG HBLG6000R Service Manual - Page 10
Refrigerant Cycle
 |
View all LG HBLG6000R manuals
Add to My Manuals
Save this manual to your list of manuals |
Page 10 highlights
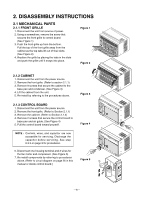
2.3.6 POWER CORD 1. Disconnect the unit from source of power. 2. Remove the front grille. (Refer to Section 2.1.1) 3. Remove the cabinet. (Refer to Section 2.1.2) 4. Remove 2 screws that secure control board to base pan and air guide. (Refer to Section 2.1.3) 5. Pulls the control board toward you. 6. Remove the grounding screw. 7. Remove a screw securing the clip with cord to the control board. 8. Pull the power cord. 9. Re-install by referring to procedures above. Figure 18 2.4 REFRIGERANT CYCLE 2.4.1 CONDENSER 1. Remove the cabinet. (Refer to Section 2.1.2) 2. Discharge the refrigerant by using a refrigerant recovery system. 3. Remove 2 screws which fasten the condenser. (See Figure 19) 4. After discharging the refrigerant completely, unbraze the interconnecting tube at the condenser connections. 5. Remove the condenser. 6. Re-install by referring to the procedures above. Figure19 2.4.2 EVAPORATOR 1. Remove the cabinet. (Refer to Section 2.1.2) 2. Discharge the refrigerant by using a refrigerant recovery system. 3. Remove the air guide upper. (Refer to Section 2.2.1) 4. After discharging the refrigerant completely, unbraze the interconnecting tube at the evaporator connections. 5. Remove the evaporator. 6. Re-install by referring to the procedures above. -10-
-
 1
1 -
2
-
3
-
4
-
 5
5 -
 6
6 -
 7
7 -
 8
8 -
 9
9 -
 10
10 -
 11
11 -
 12
12 -
 13
13 -
 14
14 -
 15
15 -
16
-
17
-
18
-
19
-
20
-
21
-
22
-
23
-
24
-
25
-
26
-
27
-
28
-
29
-
30
-
31
-
32
-
33
-
34
 |
 |
