LG REG-123A Service Manual - Page 11
Suggested Tool Requirements
 |
View all LG REG-123A manuals
Add to My Manuals
Save this manual to your list of manuals |
Page 11 highlights
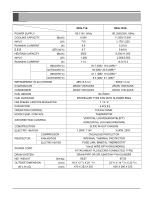
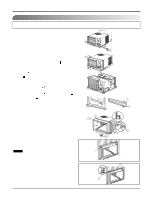
Installation Suggested Tool Requirements SCREWDRIVER (+, -), RULER, KNIFE, HAMMER, PENCIL, LEVEL Preparation of Chassis 1. Remove the screws that fasten the cabinet at both sides and at the back. 2. Slide the unit out from the cabinet by gripping the base pan handle and pulling forward while bracing the cabinet. 3. Remove EPS Material. 4. Cut the window sash seal to the proper length. Peel off the backing and attach the foam-pe to the underside of the window sash. 5. Remove the backing from the top upper guide Foam PE and attach it to the bottom of the upper guide . 6. Attach the upper guide onto the top of the cabinet with 3 type A screws. 7. Insert the frame guides into the bottom of the cabinet. 8. Insert the Frame Curtain into the upper guide and frame guides . 9. Fasten the curtains to the unit with 4 Type A screws at the both sides. Cabinet Installation 1. Open the window. Mark a line on center of the window stool(or desired air conditioner location). Carefully place the cabinet on the window stool and align the center mark on the bottom front with the center line marked in the window stool. 2. Pull the bottom window sash down behind the upper guide until it meets. Shipping screws On/Off TIMER On/Off ESNAEVREGRY Fan Cool Heat MODE On/Off TIMER On/Off Fan Cool ESNAEVREGRY Heat MODE On/Off TIMER On/Off ESNAEVREGRY Fan Cool Heat MODE 9 10 5 (Type A) 5 12 EPS Material 10 11 12 5 (Type A) NOTICE Do not pull the window sash down so tightly that the movement of Frame Curtain is restricted. Upper Guide Window Sash Window stool Front Angle Figure 2 Upper guide 10 Cabinet Frame Curtain 1 Figure 3 Service Manual 11
-
 1
1 -
2
-
3
-
4
-
5
-
 6
6 -
 7
7 -
 8
8 -
 9
9 -
 10
10 -
 11
11 -
 12
12 -
 13
13 -
 14
14 -
 15
15 -
 16
16 -
17
-
18
-
19
-
20
-
21
-
22
-
23
-
24
-
25
-
26
-
27
-
28
-
29
-
30
-
31
 |
 |
