LG WG1005R Owner's Manual - Page 15
Unit Installation
 |
View all LG WG1005R manuals
Add to My Manuals
Save this manual to your list of manuals |
Page 15 highlights
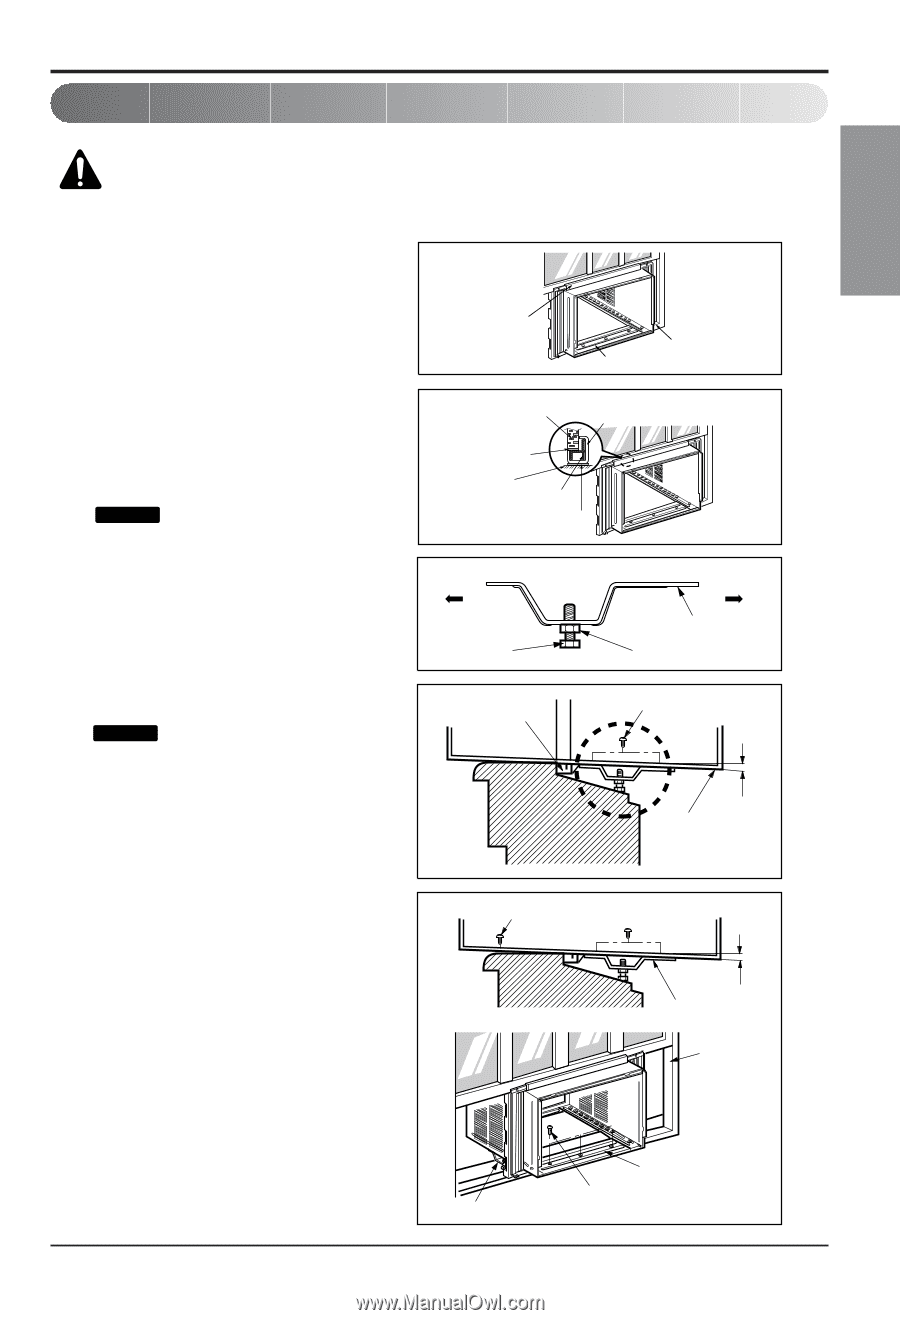
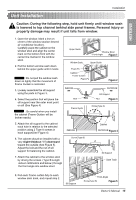
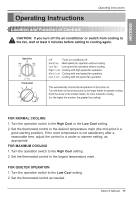
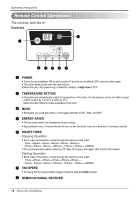
ENGLISH Installation Unit Installation Caution: During the following step, hold unit firmly until window sash is lowered to top channel behind side panel frames. Personal injury or property damage may result if unit falls from window. 1. Open the window. Mark a line on center of the window stool(or desired air conditioner location). Carefully place the cabinet on the window stool and align the center mark on the bottom front with the center line marked in the window stool. 2. Pull the bottom window sash down behind the upper guide until it meets. Tip! :Do not pull the window sash down so tightly that the movement of Frame Curtain is restricted. 3. Loosely assemble the sill support using the parts in Figure 3. 4. Select the position that will place the sill support near the outer most point on sill (See Figure 4) Tip! : Be careful when you install the cabinet (Frame Guides will be broken easily). Upper Guide Window Stool Front Angle Figure 1 Window Sash Upper Guide Foam-Pe Cabinet Frame Curtain Foam-Pe Figure 2 INDOOR Bolt Frame Guide OUTDOOR Sill Support Nut Figure 3 Screw(Type A) About 1/2" 5. Attach the sill support to the cabinet track hole in relation to the selected position using 2 Type A screws in each support(See Figure 4). 6. The cabinet should be installed with a very slight tilt(about 1/2") downward toward the outside (See Figure 5). Adjust the bolt and the nut of sill support for balancing the cabinet. 7. Attach the cabinet to the window stool by driving the screws (Type B:Length sixteen millimeters and below.) through the front angle into window stool. INDOOR Screw(Type B) Cabinet OUTDOOR Figure 4 Sill Support Sash Track About 1/2" 8. Pull each Frame curtain fully to each window sash track, and repeat step 2. Sill Support Front Angle Screw(Type B) Figure 5 Owner's Manual 15
-
 1
1 -
2
-
3
-
4
-
5
-
6
-
7
-
8
-
9
-
 10
10 -
 11
11 -
 12
12 -
 13
13 -
 14
14 -
 15
15 -
 16
16 -
 17
17 -
 18
18 -
 19
19 -
 20
20 -
21
-
22
-
23
-
24
-
25
-
26
-
27
-
28
-
29
-
30
-
31
-
32
-
33
-
34
-
35
-
36
-
37
-
38
-
39
-
40
-
41
-
42
-
43
-
44
-
45
-
46
-
47
-
48
-
49
-
50
 |
 |