Lenovo 43R2019 User Guide - Page 7
Installing, Secure, Drive - review
 |
UPC - 884343275253
View all Lenovo 43R2019 manuals
Add to My Manuals
Save this manual to your list of manuals |
Page 7 highlights
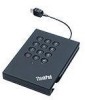
Installing the Secure Hard Drive This chapter provides information about installing the Secure Hard Drive. Before you begin the installation Be sure to review the following information before you begin to install and use the Secure Hard Drive. Attention: Use only the cables that come with this option. You might damage the drive if you use a cable not included with the option package. The option is designed for portable use without an AC power adapter. Do not attach an AC power adapter to this drive. v To avoid damaging your Secure Hard Drive, handle with care. When transporting the drive or when it is not in use, place it in the carrying case that comes with the option. v For reliable performance of the Secure Hard Drive, make sure that both USB cables are attached directly from the drive to the computer USB connectors or to an AC-powered USB hub. Do not connect the USB cables to a non-powered USB hub. Installing the Secure Hard Drive To install the Secure Hard Drive, do the following: 1. Attach one end of the auxiliary power cable to the Secure Hard Drive, and then attach the other end to an available USB port on your computer, as shown: O K ] Using the Secure Hard Drive 3
-
 1
1 -
 2
2 -
 3
3 -
 4
4 -
 5
5 -
 6
6 -
 7
7 -
 8
8 -
 9
9 -
 10
10 -
 11
11 -
 12
12 -
13
-
14
-
15
-
16
-
17
-
18
-
19
-
20
-
21
-
22
-
23
-
24
-
25
-
26
-
27
-
28
-
29
-
30
-
31
-
32
-
33
-
34
-
35
-
36
-
37
-
38
-
39
-
40
-
41
-
42
-
43
-
44
-
45
-
46
-
47
-
48
-
49
-
50
-
51
-
52
-
53
-
54
-
55
-
56
-
57
-
58
-
59
-
60
-
61
-
62
-
63
-
64
-
65
-
66
-
67
-
68
-
69
-
70
-
71
-
72
-
73
-
74
-
75
-
76
-
77
-
78
-
79
-
80
-
81
-
82
-
83
-
84
-
85
-
86
-
87
-
88
-
89
-
90
-
91
-
92
-
93
-
94
-
95
-
96
-
97
-
98
-
99
-
100
-
101
-
102
-
103
-
104
-
105
-
106
-
107
-
108
-
109
-
110
-
111
-
112
-
113
-
114
-
115
-
116
-
117
-
118
-
119
-
120
-
121
-
122
-
123
-
124
-
125
-
126
-
127
-
128
-
129
-
130
-
131
-
132
-
133
-
134
-
135
-
136
-
137
-
138
-
139
-
140
-
141
-
142
-
143
-
144
-
145
-
146
-
147
-
148
-
149
-
150
-
151
-
152
-
153
-
154
-
155
-
156
-
157
-
158
-
159
-
160
-
161
-
162
-
163
-
164
-
165
-
166
-
167
-
168
-
169
-
170
-
171
-
172
-
173
-
174
-
175
-
176
-
177
-
178
-
179
-
180
-
181
-
182
-
183
-
184
-
185
-
186
-
187
-
188
-
189
-
190
-
191
-
192
-
193
-
194
-
195
-
196
-
197
-
198
-
199
-
200
-
201
-
202
-
203
 |
 |
