Lenovo IdeaTab S1209A Lenovo IdeaTab S2109A-F Hardware Maintenance Manual - Page 43
LCD panel, for 1 minute, Then insert the plastic plate tool
 |
View all Lenovo IdeaTab S1209A manuals
Add to My Manuals
Save this manual to your list of manuals |
Page 43 highlights
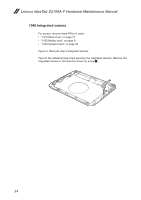
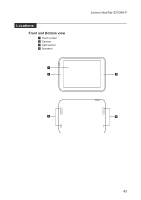
Lenovo IdeaTab S2109A-F 1080 LCD panel For access, remove these FRUs in order: •• "1010 Base cover" on page 27 •• "1020 Battery pack" on page 31 •• "1030 System board" on page 32 •• "1040 Integrated camera" on page 34 •• "1050 Speakers" on page 35 •• "1060 HDMI board" on page 37 •• "1070 Power board" on page 38 Figure 8. Removal steps of LCD panel Use a heater or dryers to heat up each point (a through j) on the touch panel for 1 minute, Then insert the plastic plate tool 1 and gently disassemble the touch panel by the plastic plate tool from point a through j. i h g f e j d c b a 1 Note: If you cannot insert the plastic plate tool, then continue heating each point (a through j) for an additional 30 seconds. 39
-
 1
1 -
2
-
3
-
4
-
5
-
6
-
7
-
8
-
9
-
10
-
11
-
12
-
13
-
14
-
15
-
16
-
17
-
18
-
19
-
20
-
21
-
22
-
23
-
24
-
25
-
26
-
27
-
28
-
29
-
30
-
31
-
32
-
33
-
34
-
35
-
36
-
37
-
 38
38 -
 39
39 -
 40
40 -
 41
41 -
 42
42 -
 43
43 -
 44
44 -
 45
45 -
 46
46 -
 47
47 -
 48
48 -
49
-
50
-
51
-
52
-
53
-
54
 |
 |

39
Lenovo IdeaTab S2109A-F
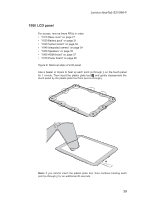
1080 LCD panel
For access, remove these FRUs in order:
•
“1010 Base cover” on page 27
•
“1020 Battery pack” on page 31
•
“1030 System board” on page 32
•
“1040 Integrated camera” on page 34
•
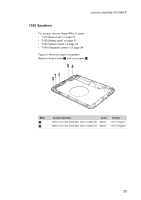
“1050 Speakers” on page 35
•
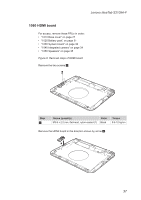
“1060 HDMI board” on page 37
•
“1070 Power board” on page 38
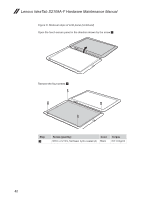
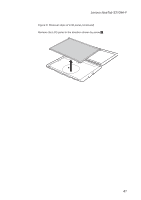
Figure 8. Removal steps of LCD panel
Use a heater or dryers to heat up each point (a through j) on the touch panel
for 1 minute, Then insert the plastic plate tool
1
and gently disassemble the
touch panel by the plastic plate tool from point a through j.
a
e
f
g
h
i
j
b
c
d
1
Note:
If you cannot insert the plastic plate tool, then continue heating each
point (a through j) for an additional 30 seconds.