Lenovo NetVista A20 (English) User guide - Page 80
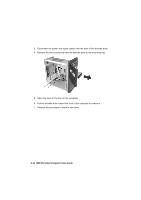
Pull the diskette drive toward the front of the computer to remove it.
 |
View all Lenovo NetVista A20 manuals
Add to My Manuals
Save this manual to your list of manuals |
Page 80 highlights
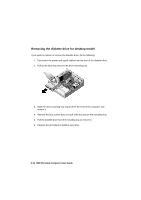
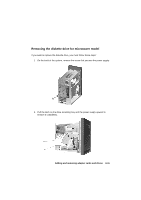
3. Disconnect the power and signal cables from the back of the diskette drive. 4. Remove the two screws that hold the diskette drive to the mounting tray. 5. Open the door on the front of the computer. 6. Pull the diskette drive toward the front of the computer to remove it. 7. Reverse the procedure to install a new drive. 6-12 IBM Personal Computer User Guide
-
 1
1 -
2
-
3
-
4
-
5
-
6
-
7
-
8
-
9
-
10
-
11
-
12
-
13
-
14
-
15
-
16
-
17
-
18
-
19
-
20
-
21
-
22
-
23
-
24
-
25
-
26
-
27
-
28
-
29
-
30
-
31
-
32
-
33
-
34
-
35
-
36
-
37
-
38
-
39
-
40
-
41
-
42
-
43
-
44
-
45
-
46
-
47
-
48
-
49
-
50
-
51
-
52
-
53
-
54
-
55
-
56
-
57
-
58
-
59
-
60
-
61
-
62
-
63
-
64
-
65
-
66
-
67
-
68
-
69
-
70
-
71
-
72
-
73
-
74
-
 75
75 -
 76
76 -
 77
77 -
 78
78 -
 79
79 -
 80
80 -
 81
81 -
 82
82 -
 83
83 -
 84
84 -
 85
85 -
86
-
87
-
88
-
89
-
90
-
91
-
92
-
93
-
94
-
95
-
96
-
97
-
98
-
99
-
100
-
101
-
102
-
103
-
104
-
105
-
106
-
107
-
108
-
109
-
110
-
111
-
112
-
113
-
114
-
115
-
116
-
117
-
118
-
119
-
120
-
121
-
122
-
123
-
124
-
125
-
126
-
127
-
128
-
129
-
130
-
131
-
132
-
133
-
134
-
135
-
136
-
137
-
138
-
139
-
140
-
141
-
142
-
143
-
144
-
145
-
146
 |
 |

6-12
IBM Personal Computer User Guide
3.
Disconnect the power and signal cables from the back of the diskette drive.
4.
Remove the two screws that hold the diskette drive to the mounting tray.
5.
Open the door on the front of the computer.
6.
Pull the diskette drive toward the front of the computer to remove it.
7.
Reverse the procedure to install a new drive.