Lenovo PC 300PL IBM PC 300PL (6565) User Guide (including system setup and opt - Page 74
Quick reference for network-related settings
 |
View all Lenovo PC 300PL manuals
Add to My Manuals
Save this manual to your list of manuals |
Page 74 highlights
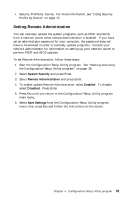
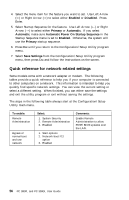
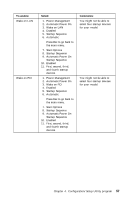
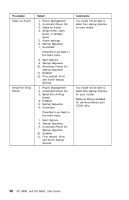
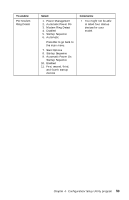
4. Select the menu item for the feature you want to set. Use Left Arrow (←) or Right Arrow (→) to select either Enabled or Disabled. Press Enter. 5. Select Startup Sequence for the feature. Use Left Arrow (←) or Right Arrow (→) to select either Primary or Automatic. If you select Automatic, make sure Automatic Power On Startup Sequence in the Startup Sequence menu is set to Enabled. Otherwise, the system will use the Primary startup sequence. 6. Press Esc until you return to the Configuration/Setup Utility program menu. 7. Select Save Settings from the Configuration/Setup Utility program menu, then press Esc and follow the instructions on the screen. Quick reference for network-related settings Some models come with a network adapter or modem. The following tables provide a quick reference to help you if your computer is connected to other computers on a network. This information is intended to help you quickly find specific network settings. You can view the current setting or select a different setting. When finished, you can either save the settings and exit the utility program or exit without saving the settings. The steps in the following table always start at the Configuration/Setup Utility main menu. To enable: Remote Administration Bypass of normal boot and use network Select: 1. System Security 2. Remote Administration 3. Enabled 1. Start options 2. Network boot F12 option 3. Enabled Comments: Enable Remote Administration to allow POST/BIOS updates over the LAN. 56 PC 300PL and PC 300GL User Guide
-
 1
1 -
2
-
3
-
4
-
5
-
6
-
7
-
8
-
9
-
10
-
11
-
12
-
13
-
14
-
15
-
16
-
17
-
18
-
19
-
20
-
21
-
22
-
23
-
24
-
25
-
26
-
27
-
28
-
29
-
30
-
31
-
32
-
33
-
34
-
35
-
36
-
37
-
38
-
39
-
40
-
41
-
42
-
43
-
44
-
45
-
46
-
47
-
48
-
49
-
50
-
51
-
52
-
53
-
54
-
55
-
56
-
57
-
58
-
59
-
60
-
61
-
62
-
63
-
64
-
65
-
66
-
67
-
68
-
 69
69 -
 70
70 -
 71
71 -
 72
72 -
 73
73 -
 74
74 -
 75
75 -
 76
76 -
 77
77 -
 78
78 -
 79
79 -
80
-
81
-
82
-
83
-
84
-
85
-
86
-
87
-
88
-
89
-
90
-
91
-
92
-
93
-
94
-
95
-
96
-
97
-
98
-
99
-
100
-
101
-
102
-
103
-
104
-
105
-
106
-
107
-
108
-
109
-
110
-
111
-
112
-
113
-
114
-
115
-
116
-
117
-
118
-
119
-
120
-
121
-
122
-
123
-
124
-
125
-
126
-
127
-
128
-
129
-
130
-
131
-
132
-
133
-
134
-
135
-
136
-
137
-
138
-
139
-
140
-
141
-
142
-
143
-
144
-
145
-
146
-
147
-
148
-
149
-
150
-
151
-
152
-
153
-
154
-
155
-
156
-
157
-
158
-
159
-
160
-
161
-
162
-
163
-
164
-
165
-
166
-
167
-
168
-
169
-
170
-
171
-
172
-
173
-
174
-
175
-
176
-
177
-
178
-
179
-
180
-
181
-
182
-
183
-
184
-
185
-
186
-
187
-
188
-
189
-
190
 |
 |