Lenovo ThinkCentre M92z White Paper for ThinkCentre M92, M92p, M92z - Page 27
Web user interface, Accessing the Web user interface, Configuring the Intel AMT computer
 |
View all Lenovo ThinkCentre M92z manuals
Add to My Manuals
Save this manual to your list of manuals |
Page 27 highlights
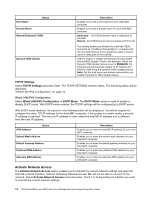
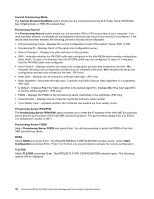
Chapter 5. Web user interface Besides managing your computers with ISV applications, you can also perform some basic management functions through the Web user interface, such as power controlling and asset inventory. The Intel ME provides a Web user interface, which enables you to check the status of Intel AMT as well. If you can access the Web user interface, your AMT setup and configuration is correct. Accessing the Web user interface This section provides instructions on how to access the AMT Web user interface. Configuring the Intel AMT computer To access the Web user interface, you need to configure the Intel AMT computer first. To configure the Intel AMT settings for accessing the Web user interface, do one of the following: • Manual setup and configuration mode 1. Repeatedly press and release Ctrl+P when turning on the computer. When you see the Intel MEBx MAIN MENU window, release the Ctrl and P keys. Select MEBx Login and press Enter in the Intel MEBx MAIN MENU window. Type the default password "admin" and then change the Intel ME password. 2. Select Intel(R) ME General Settings and press Enter. In the INTEL(R) ME PLATFORM CONFIGURATION window, select Power Control and press Enter. Then, configure settings for the Intel(R) ME ON in Host Sleep States option. 3. Select Intel(R) AMT configuration ➙ Network Setup. 4. In the INTEL(R) ME NETWORK SETUP window, select Intel(R) ME Network Name Settings and then press Enter. Set the host name and domain name for your Intel AMT computer. 5. In the INTEL(R) ME NETWORK SETUP window, select TCP/IP Settings and press Enter. Configure TCP/IP settings in the TCP/IP SETTINGS window. 6. In the INTEL(R) AMT CONFIGURATION window, select Activate Network Access and press Enter. Press Y when prompted. 7. Select MEBx Exit in the Intel MEBx MAIN MENU window to exit the MEBx. • Automatic setup and configuration mode 1. Repeatedly press and release Ctrl+P when turning on the computer. When you see the Intel MEBx MAIN MENU window, release the Ctrl and P keys. Select MEBx Login and press Enter in the Intel MEBx MAIN MENU window. Type the default password "admin" and then change the Intel ME password. 2. Select Intel(R) AMT configuration ➙ Network Setup ➙ TCP/IP Settings. Configure TCP/IP settings in the TCP/IP SETTINGS window. 3. Select Intel(R) AMT configuration ➙ Remote Setup And Configuration ➙ TLS PKI or TLS PSK. Set your valid hash or PID/PPS. 4. Select Intel(R) AMT configuration ➙ Remote Setup And Configuration ➙ RCFG. The INTEL(R) REMOTE CONFIGURATION window opens. Select Start Configuration and press Enter. Press Y when you are prompted to activate the remote configuration. 5. Select MEBx Exit in the Intel MEBx MAIN MENU window to exit the MEBx. 6. Wait until the provision server successfully provisions your Intel AMT computer. © Copyright Lenovo 2012 19
-
 1
1 -
2
-
3
-
4
-
5
-
6
-
7
-
8
-
9
-
10
-
11
-
12
-
13
-
14
-
15
-
16
-
17
-
18
-
19
-
20
-
21
-
 22
22 -
 23
23 -
 24
24 -
 25
25 -
 26
26 -
 27
27 -
 28
28 -
 29
29 -
 30
30 -
 31
31 -
 32
32 -
33
-
34
-
35
-
36
-
37
-
38
 |
 |
