Lenovo ThinkPad W530 (English) User Guide - Page 145
Setting management features, Network Boot, Asset ID EEPROM, Wake on LAN, Config, Network
 |
View all Lenovo ThinkPad W530 manuals
Add to My Manuals
Save this manual to your list of manuals |
Page 145 highlights
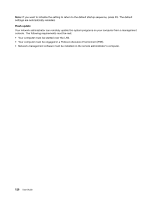
When Wake on LAN is used with network management software, many functions, such as data transfer, software updates, and Flash updates of UEFI BIOS, can be performed remotely without remote attendance. This updating process can be done after normal working hours and on weekends, to save time and increase productivity. Users are not interrupted during normal working hours, and LAN traffic is kept to a minimum. If a computer is turned on by the Wake on LAN function, the Network Boot sequence is used. Asset ID EEPROM The Asset ID EEPROM contains information about the system, including its configuration and the serial numbers of key components. It also includes a number of blank fields in which you can record information about the end users in your network. Setting management features To enable the network administrator to control your computer remotely, you must configure the network interface by setting the system-management features in the ThinkPad Setup program. You can configure the following functions in the program: • Wake on LAN • Network Boot sequence • Flash update If an administrator password (supervisor password) has been set, you will need to specify it when you start ThinkPad Setup to use these functions. Wake on LAN When the Wake on LAN feature is enabled on a computer that is connected to a LAN, a network administrator can start the computer remotely from a management console, using remote network-management software. When your computer is not under the network administrator's system management, you can disable Wake on LAN. To enable or disable Wake on LAN, do the following: 1. Start ThinkPad Setup. 2. Select Config. The Config submenu is displayed. 3. Select Network. The Network item submenu is displayed. 4. For Wake On LAN, select one of the following: AC Only, AC and Battery, or Disabled. 5. Press F10 to save changes and exit. Network Boot sequence When your computer is turned on remotely, the system will try to boot from the device that is specified in the Network Boot setting, and then follow the boot order list on the Boot menu. To define a sequence, do the following: 1. On the ThinkPad Setup program menu, select Startup. The submenu is displayed. 2. Select Network Boot and press the Enter key. The boot device list is displayed. 3. Select a boot device from the list to make it as the top boot priority. 4. Press F10 to save changes and exit. Chapter 8. Advanced configuration 127
-
 1
1 -
2
-
3
-
4
-
5
-
6
-
7
-
8
-
9
-
10
-
11
-
12
-
13
-
14
-
15
-
16
-
17
-
18
-
19
-
20
-
21
-
22
-
23
-
24
-
25
-
26
-
27
-
28
-
29
-
30
-
31
-
32
-
33
-
34
-
35
-
36
-
37
-
38
-
39
-
40
-
41
-
42
-
43
-
44
-
45
-
46
-
47
-
48
-
49
-
50
-
51
-
52
-
53
-
54
-
55
-
56
-
57
-
58
-
59
-
60
-
61
-
62
-
63
-
64
-
65
-
66
-
67
-
68
-
69
-
70
-
71
-
72
-
73
-
74
-
75
-
76
-
77
-
78
-
79
-
80
-
81
-
82
-
83
-
84
-
85
-
86
-
87
-
88
-
89
-
90
-
91
-
92
-
93
-
94
-
95
-
96
-
97
-
98
-
99
-
100
-
101
-
102
-
103
-
104
-
105
-
106
-
107
-
108
-
109
-
110
-
111
-
112
-
113
-
114
-
115
-
116
-
117
-
118
-
119
-
120
-
121
-
122
-
123
-
124
-
125
-
126
-
127
-
128
-
129
-
130
-
131
-
132
-
133
-
134
-
135
-
136
-
137
-
138
-
139
-
 140
140 -
 141
141 -
 142
142 -
 143
143 -
 144
144 -
 145
145 -
 146
146 -
 147
147 -
 148
148 -
 149
149 -
 150
150 -
151
-
152
-
153
-
154
-
155
-
156
-
157
-
158
-
159
-
160
-
161
-
162
-
163
-
164
-
165
-
166
-
167
-
168
-
169
-
170
-
171
-
172
-
173
-
174
-
175
-
176
-
177
-
178
-
179
-
180
-
181
-
182
-
183
-
184
-
185
-
186
-
187
-
188
-
189
-
190
-
191
 |
 |