Lenovo ThinkPad X220i (English) User Guide - Page 200
Startup menu, Attention, Changing the startup sequence, Startup, Network Boot, Wake on, Boot submenu
 |
View all Lenovo ThinkPad X220i manuals
Add to My Manuals
Save this manual to your list of manuals |
Page 200 highlights
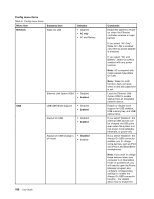
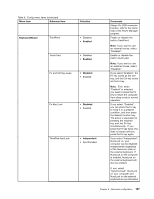
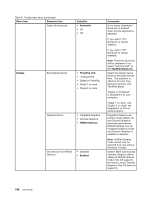
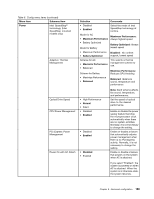
Startup menu You may need to change the startup sequence of your computer. For example, if you have different operating systems on different devices, you can have the system start up from either of them. Attention: After you change your startup sequence, you must be extremely careful not to specify a wrong device during a copy, a save, or a format operation. If you specify a wrong device, your data and programs might be erased or overwritten. Attention: If you are using the BitLocker drive encryption, you should not change the startup sequence. BitLocker drive encryption detects the change of startup sequence and locks the computer from booting. Changing the startup sequence Selecting the Startup to display the Boot submenu. To change the startup sequence, do the following: 1. Select Boot; then press Enter. • You can use the Boot submenu to specify the startup sequence that runs when you turn on the power. Refer to "Boot submenu" on page 184. • You can use the Network Boot to specify the top priority boot device that runs when Wake on LAN is commonly used by LAN administrators in corporate networks to get remote access to your computer. Refer to "Network Boot" on page 185. 2. Select the device you want to start first. Use these keys to set the order that the UEFI BIOS will use when starting an operating system: • + or - key moves the device up or down. 3. Press F10 to save the changes and restart the system. To change the startup sequence temporarily so that the system starts up from a different drive, do the following: 1. Turn off the computer. 2. Turn on the computer; then, while the "To interrupt normal startup, press the blue ThinkVantage button" message is displayed at the lower-left of the screen, press F12. 3. Select the device you want to start first from the Boot menu. Note: The Boot menu is also shown when the system cannot boot from any devices or operating system was not found. Boot submenu The following list, showing the order in which devices will be started up, is always displayed. Even devices that are not attached to or installed on your computer are listed. For each device that is attached to or installed on the computer, information about it is presented after the colon. 1. USB CD: 2. USB FDD: 3. ATAPI CD0: 4. ATA HDD0: 5. ATA HDD1: 6. ATA HDD2: 7. USB HDD: 8. PCI LAN: 184 User Guide
-
 1
1 -
2
-
3
-
4
-
5
-
6
-
7
-
8
-
9
-
10
-
11
-
12
-
13
-
14
-
15
-
16
-
17
-
18
-
19
-
20
-
21
-
22
-
23
-
24
-
25
-
26
-
27
-
28
-
29
-
30
-
31
-
32
-
33
-
34
-
35
-
36
-
37
-
38
-
39
-
40
-
41
-
42
-
43
-
44
-
45
-
46
-
47
-
48
-
49
-
50
-
51
-
52
-
53
-
54
-
55
-
56
-
57
-
58
-
59
-
60
-
61
-
62
-
63
-
64
-
65
-
66
-
67
-
68
-
69
-
70
-
71
-
72
-
73
-
74
-
75
-
76
-
77
-
78
-
79
-
80
-
81
-
82
-
83
-
84
-
85
-
86
-
87
-
88
-
89
-
90
-
91
-
92
-
93
-
94
-
95
-
96
-
97
-
98
-
99
-
100
-
101
-
102
-
103
-
104
-
105
-
106
-
107
-
108
-
109
-
110
-
111
-
112
-
113
-
114
-
115
-
116
-
117
-
118
-
119
-
120
-
121
-
122
-
123
-
124
-
125
-
126
-
127
-
128
-
129
-
130
-
131
-
132
-
133
-
134
-
135
-
136
-
137
-
138
-
139
-
140
-
141
-
142
-
143
-
144
-
145
-
146
-
147
-
148
-
149
-
150
-
151
-
152
-
153
-
154
-
155
-
156
-
157
-
158
-
159
-
160
-
161
-
162
-
163
-
164
-
165
-
166
-
167
-
168
-
169
-
170
-
171
-
172
-
173
-
174
-
175
-
176
-
177
-
178
-
179
-
180
-
181
-
182
-
183
-
184
-
185
-
186
-
187
-
188
-
189
-
190
-
191
-
192
-
193
-
194
-
 195
195 -
 196
196 -
 197
197 -
 198
198 -
 199
199 -
 200
200 -
 201
201 -
 202
202 -
 203
203 -
 204
204 -
 205
205 -
206
-
207
-
208
-
209
-
210
-
211
-
212
-
213
-
214
-
215
-
216
-
217
-
218
-
219
-
220
-
221
-
222
-
223
-
224
-
225
-
226
-
227
-
228
-
229
-
230
-
231
-
232
-
233
-
234
-
235
-
236
-
237
-
238
-
239
-
240
-
241
-
242
-
243
-
244
-
245
-
246
-
247
-
248
-
249
-
250
-
251
-
252
-
253
-
254
-
255
-
256
-
257
-
258
-
259
-
260
-
261
-
262
-
263
-
264
-
265
-
266
-
267
-
268
-
269
-
270
 |
 |