Lenovo ThinkPad X220i (English) User Guide - Page 21
Wireless LAN third, and Wireless LAN/WiMAX main
 |
View all Lenovo ThinkPad X220i manuals
Add to My Manuals
Save this manual to your list of manuals |
Page 21 highlights
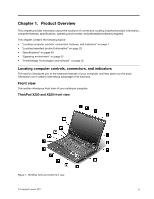
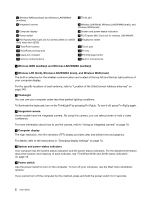
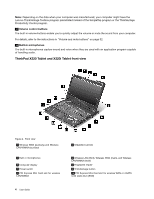
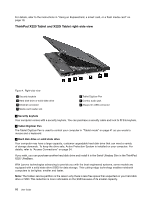
11 TrackPoint pointing stick 12 TrackPoint buttons 13 Touch pad 15 Fn key 17 System and power-status indicators 19 Built-in stereo speakers 14 CapsLock indicator 16 Volume control buttons 18 Tablet Buttons 1 Wireless WAN (auxiliary) and Wireless LAN/WiMAX (auxiliary) 4 Wireless LAN (third), Wireless WAN (main), and Wireless LAN/WiMAX (main) The built-in antennas for the wireless communication are located at the top left and the top right portions of your computer display. For the specific locations of each antenna, refer to "Location of the UltraConnect wireless antennas" on page 240. 2 Integrated camera Some models have the integrated camera. By using this camera, you can take pictures or hold a video conference. For more information about how to use the camera, refer to "Using an integrated camera" on page 78. 3 Built-in microphones The built-in microphones capture sound and voice when they are used with an application program capable of handling audio. 5 Computer display The high-resolution, thin-film transistor (TFT) display provides clear and brilliant text and graphics. For details, refer to the instructions in "Changing display settings" on page 70. 6 Fingerprint reader Some models have the fingerprint reader. The fingerprint authentication technology enables you to use your fingerprint to start the computer and enter the ThinkPad Setup. For details, refer to the instructions in "Using a fingerprint reader" on page 100. 7 Power switch Use the power switch to turn on the computer. To turn off your computer, use the Start menu shutdown options. If you cannot turn off the computer by this method, press and hold the power switch for 2 seconds. If your computer stops responding, and you cannot turn it off, press and hold the power switch for 4 seconds or more. If the system is still not reset, remove the ac power adapter and the battery. Chapter 1. Product Overview 5
-
 1
1 -
2
-
3
-
4
-
5
-
6
-
7
-
8
-
9
-
10
-
11
-
12
-
13
-
14
-
15
-
 16
16 -
 17
17 -
 18
18 -
 19
19 -
 20
20 -
 21
21 -
 22
22 -
 23
23 -
 24
24 -
 25
25 -
 26
26 -
27
-
28
-
29
-
30
-
31
-
32
-
33
-
34
-
35
-
36
-
37
-
38
-
39
-
40
-
41
-
42
-
43
-
44
-
45
-
46
-
47
-
48
-
49
-
50
-
51
-
52
-
53
-
54
-
55
-
56
-
57
-
58
-
59
-
60
-
61
-
62
-
63
-
64
-
65
-
66
-
67
-
68
-
69
-
70
-
71
-
72
-
73
-
74
-
75
-
76
-
77
-
78
-
79
-
80
-
81
-
82
-
83
-
84
-
85
-
86
-
87
-
88
-
89
-
90
-
91
-
92
-
93
-
94
-
95
-
96
-
97
-
98
-
99
-
100
-
101
-
102
-
103
-
104
-
105
-
106
-
107
-
108
-
109
-
110
-
111
-
112
-
113
-
114
-
115
-
116
-
117
-
118
-
119
-
120
-
121
-
122
-
123
-
124
-
125
-
126
-
127
-
128
-
129
-
130
-
131
-
132
-
133
-
134
-
135
-
136
-
137
-
138
-
139
-
140
-
141
-
142
-
143
-
144
-
145
-
146
-
147
-
148
-
149
-
150
-
151
-
152
-
153
-
154
-
155
-
156
-
157
-
158
-
159
-
160
-
161
-
162
-
163
-
164
-
165
-
166
-
167
-
168
-
169
-
170
-
171
-
172
-
173
-
174
-
175
-
176
-
177
-
178
-
179
-
180
-
181
-
182
-
183
-
184
-
185
-
186
-
187
-
188
-
189
-
190
-
191
-
192
-
193
-
194
-
195
-
196
-
197
-
198
-
199
-
200
-
201
-
202
-
203
-
204
-
205
-
206
-
207
-
208
-
209
-
210
-
211
-
212
-
213
-
214
-
215
-
216
-
217
-
218
-
219
-
220
-
221
-
222
-
223
-
224
-
225
-
226
-
227
-
228
-
229
-
230
-
231
-
232
-
233
-
234
-
235
-
236
-
237
-
238
-
239
-
240
-
241
-
242
-
243
-
244
-
245
-
246
-
247
-
248
-
249
-
250
-
251
-
252
-
253
-
254
-
255
-
256
-
257
-
258
-
259
-
260
-
261
-
262
-
263
-
264
-
265
-
266
-
267
-
268
-
269
-
270
 |
 |
