Lexmark 734DN Wireless Setup Guide - Page 19
Setting up serial printing, In Windows Vista, In Windows XP and earlier - driver
 |
UPC - 734646086059
View all Lexmark 734DN manuals
Add to My Manuals
Save this manual to your list of manuals |
Page 19 highlights
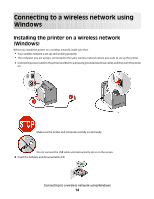
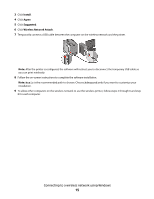
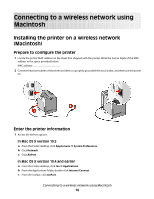
Setting up serial printing In serial printing, data is transferred one bit at a time. Although serial printing is usually slower than parallel printing, it is the preferred option when there is a great deal of distance between the printer and computer or when an interface with a better transfer rate is not available. After installing the serial port, you will need to configure the printer and the computer so they can communicate. Make sure you have connected the serial cable to the serial port on your printer. 1 Set the parameters in the printer: a From the printer control panel, navigate to the menu with port settings. b Locate the submenu with serial port settings. c Make any necessary changes to the serial settings. d Save the new settings. e Print a menu settings page. 2 Install the printer driver: a Insert the Software and Documentation CD. It launches automatically. If the CD does not launch automatically, do one of the following: In Windows Vista 1 Click . 2 In the Start Search box, type D:\setup.exe, where D is the letter of your CD or DVD drive. In Windows XP and earlier 1 Click Start. 2 Click Run. 3 Type D:\setup.exe, where D is the letter of your CD or DVD drive. b Click Install Printer and Software. c Click Agree to accept the Printer Software License Agreement. d Click Custom. e Make sure Select Components is selected, and then click Next. f Make sure Local is selected, and then click Next. g Select the manufacturer of the printer from the menu. h Select the printer model from the menu, and then click Add Printer. i Click the + beside the printer model under Select Components. j Make sure the correctport is available under SelectComponents. This is the port where the serial cable attaches to the computer. If the correct port is not available, select the port under the Select Port menu, and then click Add Port. k Make any configuration changes necessary in the Add a New Port window. Click Add Port to finish adding the port. l Make sure the box next to the selected printer model is checked. m Select any other optional software you want to install, and then click Next. n Click Finish to complete the printer software installation. Connecting to a wireless network using Macintosh 19
-
 1
1 -
2
-
3
-
4
-
5
-
6
-
7
-
8
-
9
-
10
-
11
-
12
-
13
-
 14
14 -
 15
15 -
 16
16 -
 17
17 -
 18
18 -
 19
19 -
 20
20 -
 21
21 -
 22
22 -
 23
23 -
 24
24 -
25
-
26
-
27
-
28
-
29
-
30
-
31
-
32
-
33
-
34
-
35
 |
 |
