Lexmark C522 Service Manual - Page 51
xx and 906.05-906.08-Motor bump aligner error service check, xx-Motor duplex error service check
 |
View all Lexmark C522 manuals
Add to My Manuals
Save this manual to your list of manuals |
Page 51 highlights
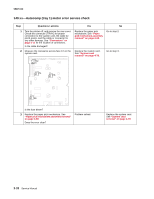
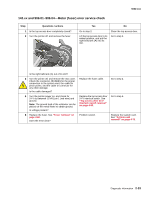
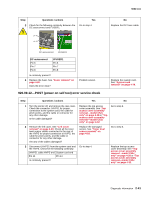
5022-xxx 145.xx and 906.05-906.08-Motor (bump aligner) error service check Step Questions / actions Yes No 1 Is the top access door completely closed? Go to step 2. Close the top access door. 2 Open the top access door, and slowly close it. You should hear the top access door 24 V interlock switch closing when the door almost shuts. If you do not, check the switch for damage. Is the switch damaged? Replace the top access door 24 V interlock switch. See "Top access door 24 V interlock switch removal" on page 4-85. Go to step 3. 3 Close the top access door. Turn printer power on, and check for 24 V dc between JCVR1 pin 1 (red wire) and ground. Note: The ground lead of the voltmeter can be placed on the metal frame to obtain ground. Is voltage present? Replace the top access door 24 V interlock switch. See "Top access door 24 V interlock switch removal" on page 4-85. Go to step 4. 4 Replace the bump aligner motor. See "Bump aligner motor removal" on page 4-40. Does the error clear? Problem solved. Replace the system card. See "System card removal" on page 4-79. 146.xx-Motor (duplex) error service check Step Questions / actions Yes No 1 Is the top access door completely closed? Go to step 2. Close the top access door. 2 Turn the printer off, and remove the rear cover. Check the connector JDUPLX1 for proper connection to the system card, the cable for pinch points, and the cable or connector for any other damage. Is the cable damaged? Replace the duplex front door assembly. See "Front door assembly removal" on page 4-55. Go to step 3. 3 Close the front access door. Turn the power on, and check for 24 V dc between JCVR1 pin 1 (red wire) and ground. Note: The ground lead of the voltmeter can be placed on the metal frame to obtain ground. Is voltage present? 4 Replace the duplex front door assembly. See "Front door assembly removal" on page 4-55. Does the error clear? Replace the top access door 24 V interlock switch. See "Top access door 24 V interlock switch removal" on page 4-85. Problem solved. Go to step 4. Replace the system card. See "System card removal" on page 4-79. 2-36 Service Manual
-
 1
1 -
2
-
3
-
4
-
5
-
6
-
7
-
8
-
9
-
10
-
11
-
12
-
13
-
14
-
15
-
16
-
17
-
18
-
19
-
20
-
21
-
22
-
23
-
24
-
25
-
26
-
27
-
28
-
29
-
30
-
31
-
32
-
33
-
34
-
35
-
36
-
37
-
38
-
39
-
40
-
41
-
42
-
43
-
44
-
45
-
 46
46 -
 47
47 -
 48
48 -
 49
49 -
 50
50 -
 51
51 -
 52
52 -
 53
53 -
 54
54 -
 55
55 -
 56
56 -
57
-
58
-
59
-
60
-
61
-
62
-
63
-
64
-
65
-
66
-
67
-
68
-
69
-
70
-
71
-
72
-
73
-
74
-
75
-
76
-
77
-
78
-
79
-
80
-
81
-
82
-
83
-
84
-
85
-
86
-
87
-
88
-
89
-
90
-
91
-
92
-
93
-
94
-
95
-
96
-
97
-
98
-
99
-
100
-
101
-
102
-
103
-
104
-
105
-
106
-
107
-
108
-
109
-
110
-
111
-
112
-
113
-
114
-
115
-
116
-
117
-
118
-
119
-
120
-
121
-
122
-
123
-
124
-
125
-
126
-
127
-
128
-
129
-
130
-
131
-
132
-
133
-
134
-
135
-
136
-
137
-
138
-
139
-
140
-
141
-
142
-
143
-
144
-
145
-
146
-
147
-
148
-
149
-
150
-
151
-
152
-
153
-
154
-
155
-
156
-
157
-
158
-
159
-
160
-
161
-
162
-
163
-
164
-
165
-
166
-
167
-
168
-
169
-
170
-
171
-
172
-
173
-
174
-
175
-
176
-
177
-
178
-
179
-
180
-
181
-
182
-
183
-
184
-
185
-
186
-
187
-
188
-
189
-
190
-
191
-
192
-
193
-
194
-
195
-
196
-
197
-
198
-
199
-
200
-
201
-
202
-
203
-
204
-
205
-
206
-
207
-
208
-
209
-
210
-
211
-
212
-
213
-
214
-
215
-
216
-
217
-
218
-
219
-
220
-
221
-
222
-
223
-
224
-
225
-
226
-
227
-
228
-
229
-
230
-
231
-
232
-
233
-
234
-
235
-
236
-
237
-
238
-
239
-
240
-
241
-
242
-
243
-
244
-
245
-
246
-
247
-
248
-
249
-
250
-
251
-
252
-
253
-
254
-
255
-
256
-
257
-
258
-
259
-
260
-
261
-
262
-
263
-
264
-
265
-
266
-
267
-
268
-
269
-
270
-
271
-
272
-
273
-
274
-
275
-
276
-
277
-
278
-
279
-
280
-
281
-
282
-
283
-
284
-
285
-
286
-
287
-
288
-
289
-
290
-
291
-
292
-
293
-
294
-
295
-
296
-
297
-
298
-
299
-
300
-
301
-
302
-
303
-
304
-
305
-
306
-
307
-
308
-
309
-
310
-
311
-
312
-
313
-
314
-
315
-
316
-
317
-
318
-
319
-
320
-
321
-
322
-
323
-
324
-
325
-
326
-
327
-
328
-
329
-
330
-
331
-
332
-
333
-
334
-
335
-
336
-
337
-
338
-
339
-
340
-
341
-
342
-
343
-
344
-
345
-
346
-
347
-
348
-
349
-
350
-
351
-
352
-
353
-
354
-
355
-
356
-
357
-
358
-
359
-
360
-
361
-
362
-
363
-
364
-
365
-
366
-
367
-
368
-
369
-
370
-
371
-
372
-
373
-
374
-
375
-
376
-
377
-
378
-
379
 |
 |
