Lexmark C912 Setup Guide - Page 22
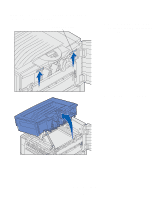
locks into the correct position., when the feeder
 |
View all Lexmark C912 manuals
Add to My Manuals
Save this manual to your list of manuals |
Page 22 highlights
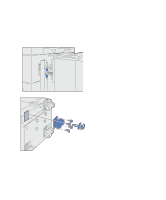
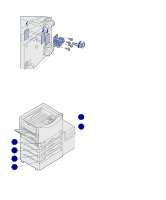
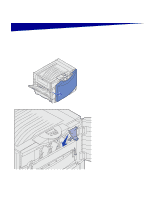
4 Roll the high capacity feeder toward the printer and check the alignment of the pins with the holes in the docking frame. If the pins do not align with the holes in the docking frame, see "Installing height adjustment spacers" on page 15. 5 Roll the high capacity feeder toward the printer until the feeder locks to the docking frame. You hear a click when the feeder locks into the correct position. 6 Attach the interface cable to the back of the printer and tighten the thumbscrews. Do not install the high capacity feeder power cord at this time. Set up the printer and paper handling options 13
-
 1
1 -
2
-
3
-
4
-
5
-
6
-
7
-
8
-
9
-
10
-
11
-
12
-
13
-
14
-
15
-
16
-
 17
17 -
 18
18 -
 19
19 -
 20
20 -
 21
21 -
 22
22 -
 23
23 -
 24
24 -
 25
25 -
 26
26 -
 27
27 -
28
-
29
-
30
-
31
-
32
-
33
-
34
-
35
-
36
-
37
-
38
-
39
-
40
-
41
-
42
-
43
-
44
-
45
-
46
-
47
-
48
-
49
-
50
-
51
-
52
-
53
-
54
-
55
-
56
-
57
-
58
-
59
-
60
-
61
-
62
-
63
-
64
-
65
-
66
-
67
-
68
-
69
-
70
-
71
-
72
-
73
-
74
-
75
-
76
-
77
-
78
-
79
-
80
-
81
-
82
-
83
 |
 |

4
Roll the high capacity feeder
toward the printer and check the
alignment of the pins with the
holes in the docking frame.
If the pins do not align with the
holes in the docking frame, see
“Installing height adjustment
spacers” on page 15.
5
Roll the high capacity feeder
toward the printer until the feeder
locks to the docking frame.
You hear a
click
when the feeder
locks into the correct position.
6
Attach the interface cable to the
back of the printer and tighten the
thumbscrews.
Do not install the high capacity
feeder power cord at this time.
Set up the printer and paper handling options
13