Lexmark MX812 Network Scan Drivers - Page 9
Using scanadf, Using OpenOffice.org, Using XSane, Using XSane 0.99 and later
 |
View all Lexmark MX812 manuals
Add to My Manuals
Save this manual to your list of manuals |
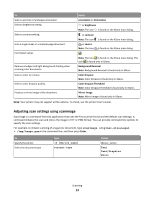
Page 9 highlights
Using scanadf 1 Open a terminal window, and then type scanadf --source="Multiple Pages" -d [device_name]. Press Enter. 2 Place your document in the ADF or on the scanner glass. 3 From the printer control panel, select your scan job. Using OpenOffice.org Note: You may use Writer, Calc, Impress, or Draw only. 1 From an OpenOffice.org application toolbar, do either of the following: • Click Insert > Picture > Scan > Select Source. • Click Insert > Graphics > Scan > Select Source. 2 From the "Device Used" menu, select your printer. 3 From the "Options" area, click Image Settings > source. 4 From the "source" menu, select Multiple Pages. 5 Click OK. 6 From an OpenOffice.org application toolbar, do either of the following: • Click Insert > Picture > Scan > Select Source. • Click Insert > Graphics > Scan > Select Source. 7 From the printer control panel, select your scan job. 8 Repeat step 6 until all the pages of your document are displayed on your computer. Using XSane 1 Open a terminal window, and then type xsane. Press Enter. 2 From the "device detection" dialog, navigate to: Available devices > select your printer > OK 3 From the menu, select Multiple Pages. 4 Click Scan. 5 Place your document in the ADF or on the scanner glass. 6 From the printer control panel, select your scan job. Using XSane 0.99 and later 1 From the menu, select Multiple Pages. 2 Click Scan. If you specify a number that is smaller than the number of pages placed in the ADF, then only the number of pages specified are scanned. You have to click Scan again to scan the remaining pages. Scanning 9
-
 1
1 -
2
-
3
-
 4
4 -
 5
5 -
 6
6 -
 7
7 -
 8
8 -
 9
9 -
 10
10 -
 11
11 -
 12
12 -
 13
13 -
 14
14 -
15
-
16
-
17
-
18
-
19
-
20
-
21
 |
 |