Lexmark Monochrome Laser Help Menu Pages - Page 11
Understanding the control panel
 |
View all Lexmark Monochrome Laser manuals
Add to My Manuals
Save this manual to your list of manuals |
Page 11 highlights
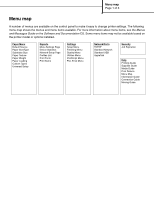
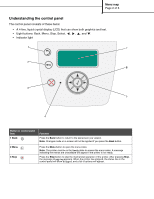
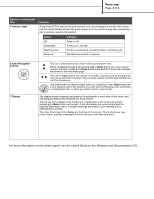
Menu map Page 2 of 3 Understanding the control panel The control panel consists of these items: • A 4-line, liquid crystal display (LCD) that can show both graphics and text. • Eight buttons: Back, Menu, Stop, Select, , , , and . • Indicator light 1 7 2 6 3 5 4 Button or control panel item 1 Back Function Press the Back button to return to the last screen you viewed. Note: Changes made on a screen will not be applied if you press the Back button. 2 Menu 3 Stop Press the Menu button to open the menu index. Note: The printer must be in the Ready state to access the menu index. A message indicating the menus are unavailable will appear if the printer is not ready. Press the Stop button to stop the mechanical operation of the printer. After pressing Stop, the message Stopping appears. When the printer has stopped, the status line in the control panel will show Stopped, and a list of options will appear.
-
 1
1 -
2
-
3
-
4
-
5
-
 6
6 -
 7
7 -
 8
8 -
 9
9 -
 10
10 -
 11
11 -
 12
12 -
 13
13 -
 14
14 -
 15
15 -
 16
16
 |
 |
