Lexmark Monochrome Laser Help Menu Pages - Page 9
Print defects guide
 |
View all Lexmark Monochrome Laser manuals
Add to My Manuals
Save this manual to your list of manuals |
Page 9 highlights
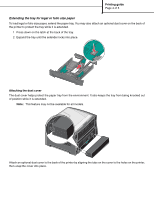
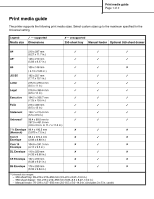
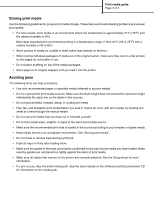
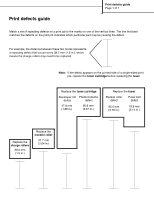
Print defects guide Print defects guide Page 1 of 1 Match a set of repeating defects on a print job to the marks on one of the vertical lines. The line that best matches the defects on the print job indicates which particular part may be causing the defect. For example, the distance between these two marks represents a repeating defect that occurs every 38.2 mm (1.5 in.), which means the charge rollers may need to be replaced. Note: If the defect appears on the printed side of a single-sided print job, replace the toner cartridge before replacing the fuser. Replace the toner cartridge Developer roll Photoconductor defect defect 47.8 mm (1.88 in.) 96.8 mm (3.81 in.) Replace the fuser Backup roller defect Fuser belt defect 95.5 mm (3.76 in.) 79.8 mm (3.14 in.) Replace the charge rollers 38.2 mm (1.5 in.) Replace the transfer roller 51.7 mm (2.04 in.)
-
 1
1 -
2
-
3
-
 4
4 -
 5
5 -
 6
6 -
 7
7 -
 8
8 -
 9
9 -
 10
10 -
 11
11 -
 12
12 -
 13
13 -
 14
14 -
15
-
16
 |
 |
