Lexmark P350 User's Guide
Lexmark P350 Manual
 |
View all Lexmark P350 manuals
Add to My Manuals
Save this manual to your list of manuals |
Lexmark P350 manual content summary:
- Lexmark P350 | User's Guide - Page 1
Lexmark 350 Series User Guide 2006 www.lexmark.com - Lexmark P350 | User's Guide - Page 2
- Lexmark P350 | User's Guide - Page 3
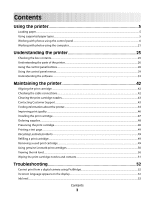
Cleaning the print cartridge nozzles...43 Contacting Customer Support...43 Finding information about the printer...44 Improving print quality...46 Installing the print cartridge...47 Ordering supplies...48 Preserving the print cartridge...48 Printing a test page...49 Recycling Lexmark products...49 - Lexmark P350 | User's Guide - Page 4
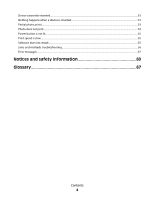
inserted...53 Nothing happens when a device is inserted...53 Partial photo prints...53 Photo does not print...54 Power button is not lit...55 Print speed is slow...55 Software does not install...55 Jams and misfeeds troubleshooting...56 Error messages...57 Notices and safety information 60 Glossary - Lexmark P350 | User's Guide - Page 5
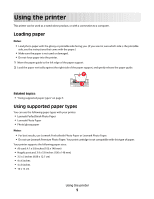
• Lexmark Perfectfinish Photo Paper • Lexmark Photo Paper • Photo/glossy paper Notes: • For best results, use Lexmark Perfectfinish Photo Paper or Lexmark Photo Paper. • Do not use Lexmark Premium Photo Paper. Your print cartridge is not compatible with this type of paper. Your printer supports the - Lexmark P350 | User's Guide - Page 6
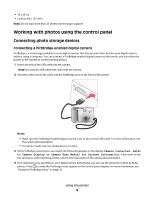
display or Camera User Manual for further information. If you want to use the camera to control printing photos, refer to the instructions in the camera documentation. 4 If no selections were specified on your digital camera beforehand, you can use the printer to control printing photos. Press to - Lexmark P350 | User's Guide - Page 7
taken using a digital camera or camera phone. The printer lets you view, edit, and print photos stored on a flash drive. For more information, see "Printing photos" on page 0 or "Editing photos" on page 0 . The printer also lets you transfer photos: • From a flash drive to a computer. For more - Lexmark P350 | User's Guide - Page 8
• If there is an arrow on the card, make sure it points toward the printer. Slot Top slot Memory card • xD Picture Card • SD (Secure Digital) • miniSD (with adapter) * • microSD (with adapter) * • RS-MMC (with adapter) * • MultiMedia Card • Memory Stick • Memory Stick PRO • Memory Stick Duo (with - Lexmark P350 | User's Guide - Page 9
use the following paper types with your printer: • Lexmark Perfectfinish Photo Paper • Lexmark Photo Paper • Photo/glossy paper Notes: • For best results, use Lexmark Perfectfinish Photo Paper or Lexmark Photo Paper. • Do not use Lexmark Premium Photo Paper. Your print cartridge is not compatible - Lexmark P350 | User's Guide - Page 10
surface with your fingers or sharp objects. For best results, remove each printed sheet individually from the paper exit tray, and allow the prints to dry at least 24 hours before stacking, displaying, or storing. Related topics: • "Using the Photo Edit Mode menu" on page 32 Using the printer 10 - Lexmark P350 | User's Guide - Page 11
the prints to dry at least 24 hours before stacking, displaying, or storing. Related topics: • "Using the Photo Edit Mode menu" on page 32 Cropping photos 1 Load photo paper with the glossy or printable side facing you. (If you are not sure which side is the printable side, see the instructions that - Lexmark P350 | User's Guide - Page 12
photos. 7 Press to select a photo for printing. 8 Press . The Photo photos automatically 1 Load photo paper with the glossy or printable side facing you. (If you are not sure which side is the printable side, see the instructions that came with the paper.) For more information, see "Loading paper - Lexmark P350 | User's Guide - Page 13
photos The Colorized Effect feature lets you print a photo in Black & White, Sepia, Antique Brown, or Antique Gray. 1 Load photo paper with the glossy or printable side facing you. (If you are not sure which side is the printable side, see the instructions through the photos. Using the printer 13 - Lexmark P350 | User's Guide - Page 14
printer: • Lexmark Perfectfinish Photo Paper • Lexmark Photo Paper • Photo/glossy paper Notes: • For best results, use Lexmark Perfectfinish Photo Paper or Lexmark Photo Paper. • Do not use Lexmark Premium Photo Paper. Your print cartridge is not compatible with this type of paper. Printing a photo - Lexmark P350 | User's Guide - Page 15
dry at least 24 hours before stacking, displaying, or storing. Related topics: • "Printing photos" on page 0 Printing all photos Use these instructions to print all photos stored on your memory card or flash drive. 1 Load photo paper with the glossy or printable side facing you. (If you are not sure - Lexmark P350 | User's Guide - Page 16
hours before stacking, displaying, or storing. Related topics: • "Printing photos" on page 0 Printing an index page of photos Use these instructions to print thumbnail images of all photos stored on your memory card or flash drive. 1 Load photo paper with the glossy or printable side facing you. (If - Lexmark P350 | User's Guide - Page 17
Printing photos" on page 0 Printing photos by range Use these instructions to select the first and last photos in a range to be printed. 1 Load photo paper until Print Photos appears on the display. 4 Press . 5 Press or repeatedly until Print Photo Range is selected. 6 Press . Using the printer 17 - Lexmark P350 | User's Guide - Page 18
side is the printable side, see the instructions that came with the paper.) For more information, see "Loading paper" on page 5. 2 Insert a memory card. For more information, see "Inserting a memory card" on page 7. 3 Press or repeatedly until Print Photos appears on the display. 4 Press . 5 Press - Lexmark P350 | User's Guide - Page 19
. The printer communicates with Bluetooth-enabled devices through a Universal Serial Bus (USB) Bluetooth adapter, which is sold separately. Printing using Bluetooth You can print photos from a Bluetooth-enabled device such as a camera phone using a USB Bluetooth adapter. 1 Load photo paper with the - Lexmark P350 | User's Guide - Page 20
port on the front of the printer. Note: Bluetooth adapter sold separately. 4 Once the printer detects the Bluetooth adapter, the following message appears on the printer display for five seconds: Bluetooth Dongle Connected. 5 To print photos from your Bluetooth-enabled device, see the documentation - Lexmark P350 | User's Guide - Page 21
"Format for" pop-up menu, choose 350 Series. 3 From the Paper Size pop-up menu, choose a paper size. 4 Click OK. Related topics: • "Choosing a paper type" on page 21 Choosing a paper type For Mac OS X version 10.3 or later: 1 With a photo open, click File Œ Print. 2 From the Copies & Pages pop-up - Lexmark P350 | User's Guide - Page 22
pop-up menu, choose 350 Series. c From the Paper Size pop-up menu, choose the paper size loaded. d Choose an orientation. e Click OK. 3 Customize the settings as needed in the Print dialog. a With a photo open, choose File ΠPrint. b From the Printer pop-up menu, choose 350 Series. c If you're using - Lexmark P350 | User's Guide - Page 23
Related topics: • "Installing the printer software" on page 33 Resizing photos using the computer 1 Load photo paper, with the glossy or printable side facing you. (If you are not sure which side is the printable side, see the instructions that came with the paper.) For more information, see " - Lexmark P350 | User's Guide - Page 24
" pop-up menu, choose 350 Series. c From the Paper Size pop-up menu, choose a paper size. d Choose an orientation. e Click OK. 8 Customize the settings as needed in the Print dialog. a With a photo selected, choose File ΠPrint. b From the Printer pop-up menu, choose 350 Series. c From the Style pop - Lexmark P350 | User's Guide - Page 25
Name Description 1 Color print cartridge Cartridge to be installed in the printer 2 Power supply Attaches to the power supply port located at the back of the printer 3 Installation software CD • Installation software for the printer • Help • User's Guide in electronic format 4 Getting - Lexmark P350 | User's Guide - Page 26
1 Paper guide Keep paper straight when feeding. 2 Paper support Load paper. 3 Handle Carry the printer. 4 Access cover Access the print cartridge. 5 Paper exit tray Hold paper as it exits. 6 PictBridge port Connect a PictBridge-enabled digital camera, a flash drive, or a Bluetooth adapter to - Lexmark P350 | User's Guide - Page 27
Use the To 1 Power supply port Connect the printer to a power source using the power supply. 2 USB port Connect the printer to a computer using a USB cable. Related topics: • "Checking the box contents" on page 25 Understanding the printer 27 - Lexmark P350 | User's Guide - Page 28
the paper. 9 • In the photo selection screen, bring up the Photo Edit Mode menu. • In the Print Preview screen, bring up the Print Settings menu. 10 • Navigate through submenus of a menu. • When previewing a photo, increase the number of copies to be printed. Understanding the printer 28 - Lexmark P350 | User's Guide - Page 29
Preview See a preview of the photo/s to be printed. You can also press to adjust the print settings, including paper size, photo size, layout, print quality, paper type, and passport photo print settings. Related topics: • "Printing photos" on page 0 Using the Print Photos menu This menu allows you - Lexmark P350 | User's Guide - Page 30
number of copies to print per photo. • Other Print Settings to choose a paper size, photo size, layout, print quality, and paper type. Print Photos by Date Print photos taken within certain dates. For more information, see "Printing photos by date" on page 17. Print Photo Range Select the first - Lexmark P350 | User's Guide - Page 31
be turned off. Press any button to restore power to the printer. Print Settings Select a paper size, photo size, layout, print quality, and paper type. Maintenance Select: • View Ink Level to view a graphic representing the ink level in the print cartridge. For more information, see "Viewing the - Lexmark P350 | User's Guide - Page 32
number automatically assigned to your Bluetooth-enabled device. • Device Address to view the 48-bit address of your Bluetooth-enabled device. Select: • • "Maintaining the printer" on page 42 Using the Photo Edit Mode menu When you are viewing a photo, press to access the Photo Edit Mode menu. - Lexmark P350 | User's Guide - Page 33
.lexmark.com. 2 From the home page, navigate through the menu selection, and then click Drivers & Downloads. 3 Choose the printer and the printer driver for your operating system. 4 Follow the instructions on the computer screen to download the driver and install the printer software. Understanding - Lexmark P350 | User's Guide - Page 34
the printer software" on page 33 Using Printer Services Printer Services provides helpful Web links and information. From here you can: • Access the Utility. • Access Troubleshooting. • Order supplies. • Contact Customer Support. • Obtain software version information. Understanding the printer 34 - Lexmark P350 | User's Guide - Page 35
To access Printer Services: 1 With a photo open, click File Œ Print. 2 From the third pop-up menu from the top, choose Printer Services. Note: For Mac OS X version 10.4 or later, click Advanced. From the third pop-up menu from the top, choose Printer Services. Related topics: • "Using the Utility" - Lexmark P350 | User's Guide - Page 36
settings as the default settings. Format for The name of your printer Format a page for printing with the printer. Paper Size Orientation Choose a paper size from the list. Choose an orientation. Scale Reduce or enlarge a photo to a percentage of its original size. Note: Recommended values are - Lexmark P350 | User's Guide - Page 37
paper. Print the photos in a specified order. Print a border around each photo. Save the print job as a file. Note: Format is activated when Save as File option is selected. Schedule a print job. You can choose to print a photo immediately, put it on hold, or specify a time for the printer to print - Lexmark P350 | User's Guide - Page 38
Page Quality & Media Printer Services Choose Page Order Print Destination Paper Size Color Conversion Quartz Filter Printer Cover Page Cover Page Type Billing Info Paper Type Print Quality Lexmark 350 Series Utility Troubleshooting Order Supplies Contact Lexmark Software Version To Choose any - Lexmark P350 | User's Guide - Page 39
maintenance and helpful Web links. From here you can: • Install the print cartridge. • Print a test page. • Print an alignment page. • Clean the print cartridge nozzles. • Order ink or supplies. • Register your printer. • Contact Customer Support. • Check for special offers. Understanding the - Lexmark P350 | User's Guide - Page 40
menu from the top, choose Printer Services. 3 Click Lexmark 350 Series Utility. For Mac OS X version 10.4 or later: 1 With a photo open, click File ΠPrint. 2 Click Advanced. 3 From the third pop-up menu from the top, choose Printer Services. 4 Click Lexmark 350 Series Utility. The Utility has two - Lexmark P350 | User's Guide - Page 41
- Web Links Tab Related topics: • "Using Printer Services" on page 34 Understanding the printer 41 - Lexmark P350 | User's Guide - Page 42
your photo again. If print quality has not improved, clean the print cartridge nozzles. Related topics: • "Cleaning the print cartridge nozzles" on page 43 Checking the cable connections Verify the following items, and then send your photo to print again. • Did you connect the power supply cord to - Lexmark P350 | User's Guide - Page 43
damaged or loose. Cleaning the print cartridge nozzles 1 Load photo paper, with the glossy or printable side facing you. (If you are not sure which side is the printable side, see the instructions that came with the paper.) For more information, see "Loading paper" on page 5. 2 Press or repeatedly - Lexmark P350 | User's Guide - Page 44
the • Using the software Lexmark 350 Series folder. • Loading paper 2 Double-click the printer Help icon. • Printing • Working with photos • Scanning (if supported by your printer) • Making copies (if supported by your printer) • Faxing (if supported by your printer) • Maintaining the - Lexmark P350 | User's Guide - Page 45
the printed furnishes a limited warranty that Limited Warranty included with this warranty that shipped with your this printer will be free of defects in printer, or set forth at printer. materials and workmanship for a www.lexmark.com. period of 12 months after the 1 Click customer support - Lexmark P350 | User's Guide - Page 46
Perfectfinish Photo Paper or Lexmark Photo Paper. Note: Do not use Lexmark Premium Photo Paper. Your print cartridge is not compatible with this type of paper. • Load the paper with the glossy or printable side facing you. (If you are not sure which side is the printable side, see the instructions - Lexmark P350 | User's Guide - Page 47
to open the cartridge carrier. Note: If a cartridge is present, remove it. 4 Insert the cartridge. 5 Close the cartridge carrier. 6 Close the access cover. 7 Load paper into the paper support. 8 When prompted on the display, press to print the cartridge alignment page. Maintaining the printer 47 - Lexmark P350 | User's Guide - Page 48
supplies or to locate a dealer near you, visit the Lexmark Web site at www.lexmark.com. Item Color cartridge USB cable Part number 45 1021294 Notes: • For best results, use Lexmark Perfectfinish Photo Paper or Lexmark Photo Paper. • Do not use Lexmark Premium Photo Paper. Your print cartridge - Lexmark P350 | User's Guide - Page 49
cartridge. Lexmark does not recommend use of a refilled cartridge. Refilling a cartridge can affect print quality and may cause damage to the printer. For best results, use Lexmark supplies. Removing a used print cartridge 1 Make sure the printer is on. 2 Open the access cover. The print cartridge - Lexmark P350 | User's Guide - Page 50
on page 48 Using genuine Lexmark print cartridges Lexmark printers, print cartridges, and photo paper are designed to perform together for superior print quality. If you receive an Out of Original Lexmark Ink message, the original Lexmark ink in the indicated cartridge (s) has been depleted. If you - Lexmark P350 | User's Guide - Page 51
and contacts dry completely. 7 Reinsert the print cartridge. 8 Print the photo again. 9 If print quality does not improve, clean the print nozzles. For more information, see "Cleaning the print cartridge nozzles" on page 43. 10 Repeat "Cleaning the print cartridge nozzles" on page 43 up to two - Lexmark P350 | User's Guide - Page 52
will need to be replaced soon. 25% full Your Color Cartridge will need to be replaced soon. 15% full Your Color Cartridge will need to be replaced very soon. 5% full Note: These messages and percentages may not apply to the starter cartridge that shipped with your printer. Troubleshooting 52 - Lexmark P350 | User's Guide - Page 53
, see "Installing the print cartridge" on page 47. To order supplies, see "Ordering supplies" on page 48. 2 Press to continue. Device cannot be inserted Make sure that the type of memory card, flash drive, PictBridge camera, or Bluetooth adapter you are using can be used in the printer. For more - Lexmark P350 | User's Guide - Page 54
the printer off. 2 Disconnect the power supply cord from the wall outlet. 3 Disconnect the other end of the power supply cord from the printer. 4 Reconnect the power supply cord to the printer. 5 Plug the power supply cord into the wall outlet. 6 Press to turn the printer back on. Troubleshooting 54 - Lexmark P350 | User's Guide - Page 55
disconnected the power supply cord from the printer and then from the wall outlet. 1 Plug the cord all the way into the power supply port on the printer. 2 Plug the cord into an electrical outlet that other electrical devices have been using. 3 If the light is not on, press . Print speed is slow - Lexmark P350 | User's Guide - Page 56
computer. Jams and misfeeds troubleshooting Paper jam in the paper support 1 Press to turn off the printer. 2 Firmly grasp the paper, and gently pull it out. 3 Press to turn the printer back on. Paper jam in the printer 1 Press to turn off the printer. 2 Firmly grasp the paper, and gently pull it - Lexmark P350 | User's Guide - Page 57
removed. 3 Reinsert the print cartridge. 4 Press to align the cartridge. SOLUTION 2 Load photo paper, with the glossy or printable side facing you. (If you are not sure which side is the printable side, see the instructions that came with the paper.) Load new paper only. The printer will read any - Lexmark P350 | User's Guide - Page 58
Error 1 Remove the print cartridge. 2 Disconnect the power supply cord from the electrical outlet. 3 Reconnect the power supply cord to the electrical outlet. 4 If the button is not lit, press . 5 Reinsert the cartridge. 6 If the cartridge error returns, install a new cartridge. For more information - Lexmark P350 | User's Guide - Page 59
Jam See "Jams and misfeeds troubleshooting" on page 56. Paper Out 1 Load photo paper, with the glossy or printable side facing you. (If you are not sure which side is the printable side, see the instructions that came with the paper.) For more information, see "Loading paper" on page 5. 2 Press - Lexmark P350 | User's Guide - Page 60
conjunction with other products, programs, or services, except those expressly designated by the manufacturer, are the user's responsibility. © 2006 Lexmark International, Inc. All rights reserved. UNITED STATES GOVERNMENT RIGHTS This software and any accompanying documentation provided under this - Lexmark P350 | User's Guide - Page 61
damage your product hardware or software. CAUTION-POTENTIAL INJURY: A used in accordance with the instructions, may cause harmful interference turning the equipment off and on, the user is encouraged to try to correct the to: Director of Lexmark Technology & Services Lexmark International, Inc. 740 - Lexmark P350 | User's Guide - Page 62
limits. A declaration of conformity with the requirements of the directives has been signed by the Director of Manufacturing and Technical Support, Lexmark International, Inc., S.A., Boigny, France. This product satisfies the Class B limits of EN 55022 and safety requirements of EN 60950. Japanese - Lexmark P350 | User's Guide - Page 63
dBA Printing 37 Scanning not applicable Copying not applicable Ready Inaudible Values are subject to change. See www.lexmark.com visit the Lexmark Web site at www.lexmark.com for your local sales office phone number. ENERGY STAR Safety information Connect the power supply cord to an - Lexmark P350 | User's Guide - Page 64
The product is waiting for a print job. 5.7 Power Saver The product is in energy- power draws may be substantially higher than the average. Values are subject to change. See www.lexmark amount of power, then to completely stop product power consumption, disconnect the power supply cord from the - Lexmark P350 | User's Guide - Page 65
all print cartridges, programs, data, and removable storage media (unless directed otherwise by Lexmark). For further explanation of your warranty alternatives and the nearest Lexmark authorized servicer in your area, contact Lexmark at (800) 332-4120, or on the World Wide Web at support.lexmark.com - Lexmark P350 | User's Guide - Page 66
Lexmark or a Lexmark authorized servicer -Operation of a product beyond the limit of its duty cycle -Use of printing media outside of Lexmark specifications -Supplies (such as ink) not furnished by Lexmark -Products, components, parts, materials, software SPECIFICATIONS, PRICES, AND SERVICES ARE - Lexmark P350 | User's Guide - Page 67
area of the print cartridge through which ink flows before it is applied to paper during printing. Treated paper designed for printing photos. A feature in some digital cameras that enables the user to print images without using a computer or image-editing software. A port on the printer used with - Lexmark P350 | User's Guide - Page 68
USB cable USB port A lightweight, flexible cable that lets the printer communicate with the computer at much higher speeds than parallel cables. A small, rectangular port on the back of a printer or a computer that connects peripheral devices using a USB cable. Glossary 68
-
 1
1 -
 2
2 -
 3
3 -
 4
4 -
 5
5 -
 6
6 -
 7
7 -
8
-
9
-
10
-
11
-
12
-
13
-
14
-
15
-
16
-
17
-
18
-
19
-
20
-
21
-
22
-
23
-
24
-
25
-
26
-
27
-
28
-
29
-
30
-
31
-
32
-
33
-
34
-
35
-
36
-
37
-
38
-
39
-
40
-
41
-
42
-
43
-
44
-
45
-
46
-
47
-
48
-
49
-
50
-
51
-
52
-
53
-
54
-
55
-
56
-
57
-
58
-
59
-
60
-
61
-
62
-
63
-
64
-
65
-
66
-
67
-
68
 |
 |
Lexmark 350 Series
User Guide
2006
www.lexmark.com