Lexmark Platinum Pro900 SmartSolutions User's Guide - Page 8
Understanding the Solution Center, Using the Solution Library
 |
View all Lexmark Platinum Pro900 manuals
Add to My Manuals
Save this manual to your list of manuals |
Page 8 highlights
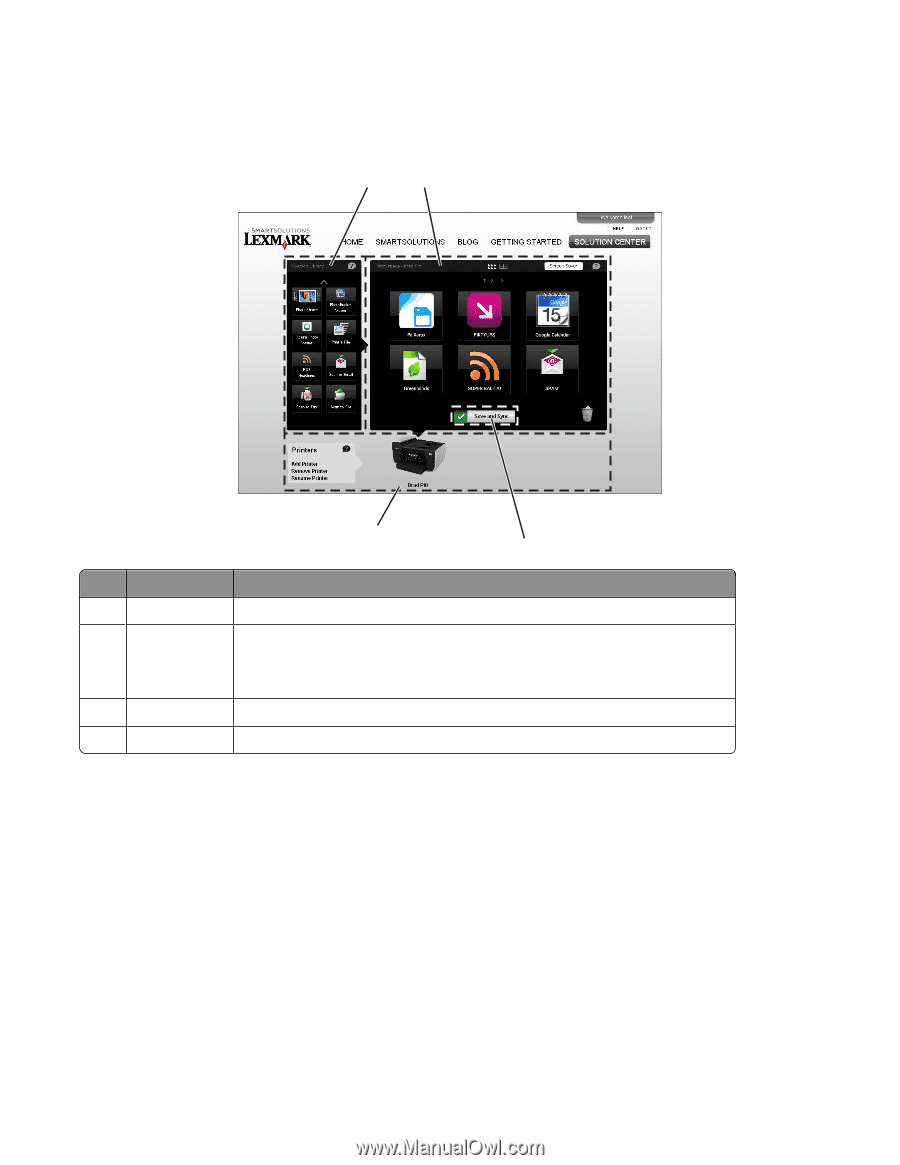
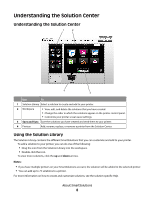
Understanding the Solution Center Understanding the Solution Center 1 2 4 3 Use To 1 Solution Library Select a solution to create and add to your printer. 2 Workspace • View, edit, and delete the solutions that you have created. • Change the order in which the solutions appear on the printer control panel. • Customize your printer screen saver settings. 3 Save and Sync Save the solutions you have created and send them to your printer. 4 Printers Add, rename, replace, or remove a printer from the Solution Center. Using the Solution Library The Solution Library contains the different SmartSolutions that you can customize and add to your printer. To add a solution to your printer, you can do one of the following: • Drag the icon from the Solution Library into the workspace. • Double-click the icon. To view more solutions, click the up and down arrows. Notes: • If you have multiple printers on your SmartSolutions account, the solution will be added to the selected printer. • You can add up to 75 solutions to a printer. For more information on how to create and customize solutions, see the solution-specific Help. About SmartSolutions 8
-
 1
1 -
2
-
 3
3 -
 4
4 -
 5
5 -
 6
6 -
 7
7 -
 8
8 -
 9
9 -
 10
10 -
 11
11 -
 12
12 -
 13
13 -
14
-
15
-
16
-
17
-
18
-
19
-
20
-
21
-
22
-
23
-
24
-
25
-
26
-
27
-
28
-
29
-
30
-
31
-
32
-
33
-
34
-
35
-
36
-
37
-
38
-
39
-
40
-
41
-
42
-
43
-
44
-
45
-
46
-
47
-
48
-
49
-
50
-
51
 |
 |