Lexmark X7500 Service Manual - Page 108
Left DADF Platen Glass Plate Removal, DADF Assembly Removal
 |
UPC - 734646391306
View all Lexmark X7500 manuals
Add to My Manuals
Save this manual to your list of manuals |
Page 108 highlights
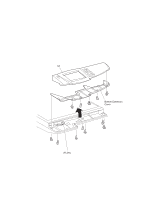
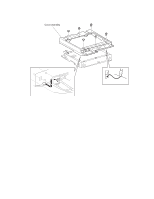
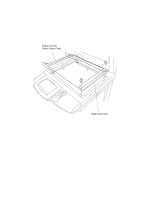
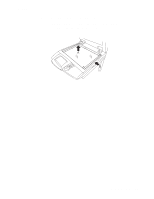
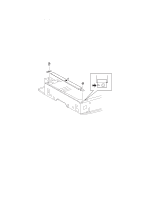
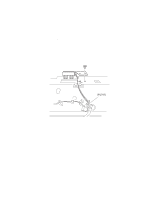
4036-501 Left DADF Platen Glass Plate Removal 1. Remove the DADF assembly. See "DADF Assembly Removal" on page 4-9 for more information. 2. Remove the user interface panel. See "User Interface Panel Removal" on page 4-49 for more information. 3. Remove the flatbed scanner top cover assembly. See "Flatbed Scanner Top Cover Assembly Removal" on page 4-50 for more information. 4. Remove two (2) screws. 5. Remove the two (2) brackets. 6. Remove the left DADF platen glass plate. When reinstalling the DADF platen glass place, ensure the white stripe on the glass is positioned toward the rear of the scanner. 4-54 Service Manual
-
 1
1 -
2
-
3
-
4
-
5
-
6
-
7
-
8
-
9
-
10
-
11
-
12
-
13
-
14
-
15
-
16
-
17
-
18
-
19
-
20
-
21
-
22
-
23
-
24
-
25
-
26
-
27
-
28
-
29
-
30
-
31
-
32
-
33
-
34
-
35
-
36
-
37
-
38
-
39
-
40
-
41
-
42
-
43
-
44
-
45
-
46
-
47
-
48
-
49
-
50
-
51
-
52
-
53
-
54
-
55
-
56
-
57
-
58
-
59
-
60
-
61
-
62
-
63
-
64
-
65
-
66
-
67
-
68
-
69
-
70
-
71
-
72
-
73
-
74
-
75
-
76
-
77
-
78
-
79
-
80
-
81
-
82
-
83
-
84
-
85
-
86
-
87
-
88
-
89
-
90
-
91
-
92
-
93
-
94
-
95
-
96
-
97
-
98
-
99
-
100
-
101
-
102
-
 103
103 -
 104
104 -
 105
105 -
 106
106 -
 107
107 -
 108
108 -
 109
109 -
 110
110 -
 111
111 -
 112
112 -
 113
113 -
114
-
115
-
116
-
117
-
118
-
119
-
120
-
121
-
122
-
123
-
124
-
125
-
126
-
127
-
128
-
129
-
130
-
131
-
132
-
133
-
134
-
135
-
136
-
137
-
138
-
139
-
140
-
141
-
142
-
143
-
144
-
145
-
146
-
147
-
148
-
149
-
150
-
151
-
152
-
153
-
154
-
155
-
156
-
157
-
158
-
159
-
160
-
161
-
162
-
163
-
164
-
165
-
166
-
167
-
168
-
169
-
170
-
171
-
172
-
173
-
174
-
175
-
176
-
177
-
178
-
179
-
180
-
181
-
182
-
183
-
184
-
185
-
186
-
187
-
188
-
189
-
190
-
191
-
192
-
193
-
194
-
195
-
196
 |
 |

4-54
Service Manual
4036-501
Left DADF Platen Glass Plate Removal
1.
Remove the DADF assembly. See
“DADF Assembly Removal” on page 4-9
for
more information.
2.
Remove the user interface panel. See
“User Interface Panel Removal” on
page 4-49
for more information.
3.
Remove the flatbed scanner top cover assembly. See
“Flatbed Scanner Top Cover
Assembly Removal” on page 4-50
for more information.
4.
Remove two (2) screws.
5.
Remove the two (2) brackets.
6.
Remove the left DADF platen glass plate.
When reinstalling the DADF platen glass place, ensure the white stripe on the glass is
positioned toward the rear of the scanner.