Lexmark Z43 Color Jetprinter User's Guide for Windows 95 and Windows 98 - Page 17
The screen graphic changes as you make selections, showing how the printed will look.
 |
View all Lexmark Z43 Color Jetprinter manuals
Add to My Manuals
Save this manual to your list of manuals |
Page 17 highlights
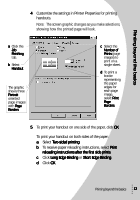
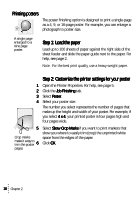
Printing beyond the basics 4 Customize the settings in Printer Properties for printing handouts. Note: The screen graphic changes as you make selections, showing how the printed page will look. a Click the Job Finishing tab. b Select Handout. The graphic shows three Portraitoriented page images with Page Borders. c Select the Number of Prints (page images) to print on a single sheet. d To print a border representing the paper edges for each page image, select Print Page Borders. 5 To print your handout on one side of the paper, click OK. To print your handout on both sides of the paper: a Select Two-sided printing. b To receive paper reloading instructions, select Print reloading instructions after the first side prints. c Click Long Edge Binding or Short Edge Binding. d Click OK. Printing beyond the basics 13
-
 1
1 -
2
-
3
-
4
-
5
-
6
-
7
-
8
-
9
-
10
-
11
-
 12
12 -
 13
13 -
 14
14 -
 15
15 -
 16
16 -
 17
17 -
 18
18 -
 19
19 -
 20
20 -
 21
21 -
 22
22 -
23
-
24
-
25
-
26
-
27
-
28
-
29
-
30
-
31
-
32
-
33
-
34
-
35
-
36
-
37
-
38
-
39
-
40
-
41
-
42
-
43
-
44
-
45
-
46
-
47
-
48
 |
 |
