Linksys PCMPC200 User Guide - Page 23
Windows NT Domain
 |
UPC - 745883548422
View all Linksys PCMPC200 manuals
Add to My Manuals
Save this manual to your list of manuals |
Page 23 highlights
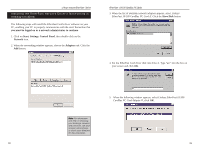
Linksys Instant EtherFast® Series Windows 98 or 95 Client for windows NT If you are installing the EtherFast 10/100 CardBus PC Card in a Windows 95 or 98 PC that you plan on logging into a NT domain server, follow the directions below. 1. Follow the Windows 95 setup instructions or the Windows 98 setup instructions 2. Start up Windows. Click on Start, Settings, then Control Panel. Doubleclick on Network. The Network window appears. Click on the Configuration tab. 3. In the Primary Network Logon box, choose Client for Microsoft Networks, which instructs your PC to log into an NT 4.0 server where you already have a username and password set up. 4. Under the the following network components are installed box, highlight Client for Microsoft Networks and click on the Properties button. 5. The Client for Microsoft Networks Properties window will appear. Under the Logon Validation box, make sure that Log on to Windows NT domain is checked. Enter the name of your domain into the Windows NT Domain box. Click OK. 6. Optional: Click on the Access Control tab. Make sure that Share-level access control is selected; do not choose User-level access control. If Access Control is grayed out and cannot be selected, refer to Troubleshooting problem 5 on page 35. 7. When you're done, click OK. When asked if you want to restart your PC, choose to do so. The NT portion of the Windows setup is complete. EtherFast® 10/100 CardBus PC Cards Starting Over in Windows 95 and 98 If you experience installation difficulties, you may need to re-install all of the Windows networking components from scratch. The instructions below explain how to give your PC a clean sweep so that you can start the EtherFast Card's software installation over. 1. At the desktop click on the Start Button, highlight Settings, click on Control Panel. 2. Double-click on the Network Icon. 3. If the Configuration box has a component called Dial-Up Adapter, skip forward to step 5. If it doesn't, continue with step 4. 4. Remove any instance of the name Linksys in the box. This includes IPS/SPX...Linksys, NetBEUI...Linksys, and TCP/IP...Linksys. Also remove Client for Microsoft Networks, Client for NetWare Networks, and File and Printer Sharing for Microsoft Networks. Note: Screen shots are for demonstration purposes only. Actual product and adapter names may vary depending on which product you are installing. 40 41
-
 1
1 -
2
-
3
-
4
-
5
-
6
-
7
-
8
-
9
-
10
-
11
-
12
-
13
-
14
-
15
-
16
-
17
-
 18
18 -
 19
19 -
 20
20 -
 21
21 -
 22
22 -
 23
23 -
 24
24 -
 25
25 -
 26
26 -
 27
27 -
 28
28 -
29
 |
 |
