Mackie 1604-VLZ Pro Owner's Manual - Page 21
Pre, 5/6 Shift, Pre Vs. Post
 |
View all Mackie 1604-VLZ Pro manuals
Add to My Manuals
Save this manual to your list of manuals |
Page 21 highlights
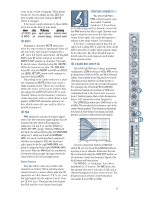
OO OO OO OO OO We recommend going into a stereo reverb in mono and returning in stereo. We have found that on most "stereo" reverbs, the second input just ties up an extra aux send and adds nothing to the sound. There are exceptions, so feel free to try it both ways. Should you choose to use two aux sends, use the "odd" AUX (1, 3 or 5) to feed its left input and the "even" AUX (2, 4 or 6) to feed the right input. Remember, if you're also dealing with a stereo source signal, you'll want to follow the sides - use the odd AUX on the channel carrying the left side and the even AUX on the channel carrying the right. PRE This switch determines the tap point of AUX 1 and 2. Generally, "post" sends are used to feed effects devices, and "pre" sends are used to feed your stage monitors. See the "Pre vs. Post" diagram below. AUX 3 through 6 are always in post mode. In post mode (switch up), AUX 1 and 2 will follow the EQ, LOW CUT, fader and MUTE settings. If you fade the channel, you fade the send. This is a must for effects sends, since you want the levels of your "wet" signals to follow the level of the "dry." In PRE mode (switch down), AUX 1 and 2 follow the TRIM and LOW CUT settings only. EQ, PAN, fader and MUTE settings have no effect on the PRE sends. This is the preferred method for setting up stage monitor feeds - they'll be controlled independently of the fader and mute moves. 5/6 SHIFT Don't let the fact that there's only four AUX knobs per channel fool you - the 1604-VLZ PRO has six AUX SENDs. With the 5/6 SHIFT switch up, the knobs labeled AUX 3 and AUX 4 deliver their signals to AUX SEND 3 and 4 outputs. With the shift switch down, the signals appear at the AUX SEND 5 and 6 outputs. We recommend that AUX SEND 3 and 4 be patched into your "utility" effects, like a short reverb and slap delay; effects you use all the time. Use AUX SEND 5 and 6 for "exotic" effects, like harmonizers and multi-tap delays; they are not likely to be used as often. INPUT TRIM Pre Vs. Post INSERT LOW CUT MUTE EQ FADER 'PRE' SIGNAL 'POST' SIGNAL PAN ASSIGN AUX 1 PRE SWITCH AUX 2 TRIM 1 U M-1IC0dGBAVIN 0 60 +15dB -45dB AUX U 1 +15 U 2 +15 PRE U 3 5 +15 U 4 6 +15 5/6 SHIFT EQ U HI 12k -15 +15 U MID -15 +15 800 200 2k 100 8k U LOW 80Hz -15 +15 LOW CUT 75 Hz 18dB/OCT PAN LR 1 MUTE OL -20 SOLO 1-2 3-4 L - R 21
-
 1
1 -
2
-
3
-
4
-
5
-
6
-
7
-
8
-
9
-
10
-
11
-
12
-
13
-
14
-
15
-
 16
16 -
 17
17 -
 18
18 -
 19
19 -
 20
20 -
 21
21 -
 22
22 -
 23
23 -
 24
24 -
 25
25 -
 26
26 -
27
-
28
-
29
-
30
-
31
-
32
-
33
-
34
-
35
-
36
-
37
-
38
-
39
-
40
 |
 |
