Marantz SR5001 Marantz AV Receiver IR Remote Code List - Page 28
Setup - subwoofer
 |
View all Marantz SR5001 manuals
Add to My Manuals
Save this manual to your list of manuals |
Page 28 highlights
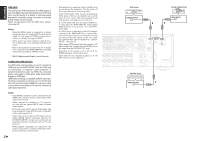
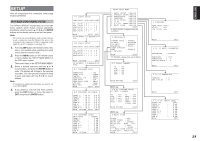
SETUP After all components are connected, initial setup must be performed. ON SCREEN DISPLAY MENU SYSTEM The SR4001/SR5001 incorporates an on-screen menu system, which makes various operations possible by using the cursor (3, 4, 1, 2) and ENTER buttons on the remote control or on the front panel. Note: To view the on-screen displays, make certain you have made a connection from the Monitor Out jack on the rear panel to the composite, S-Video, component video input of your TV or projector. (see page 19) 1. Press the AMP button of the remote control.(This step is not needed when operating the setup menus from the receiver itself.) 2. Press the MENU button on the remote control or set to display the "SETUP MAIN MENU" of the OSD menu system. There are 8 items in the SETUP MAIN MENU. 3. Select a desired sub-menu with the 3 or 4 cursor buttons, and press the ENTER button to enter. The display will change to the selected sub-menu. You can lock the condition of setup to each sub-menu with the 1 or 2 or cursor buttons. Note: If you desire to adjust any sub-menu, you need to set it to UNLOCKED. 4. If you desire to exit from this menu system, press the EXIT button, or move the cursor to EXIT and press the ENTER button. 1-1 INPUT SETUP FUNC:MODE :DIG:HDMI:COMP TV :AUTO : 3 : - : DVD :AUTO : 1 : 1 : 1 VCR1:AUTO : - : - : 3 DSS :AUTO : 2 : 2 : 2 AUX1:AUTO : F : - : - MAIN NEXT EXIT * For the SR4001, "-" is displayed for TV DIG. 1-2 INPUT SETUP FUNC:MODE :DIG:HDMI:COMP CD :AUTO : 4 : : TAPE:AUTO : - : : CD-R:AUTO : 5 : : AUX2:AUTO : - : : MAIN RETURN EXIT * For the SR4001, "3" is displayed for CDR DIG. 2-1 SPEAKERS SIZE SUBWOOFER : YES FRONT L/R : LARGE CENTER : SMALL SURROUND L/R : SMALL SURR.BACK : 2CH SURR.BACK SIZE : SMALL LPF/HPF : 100Hz BASS MIX : BOTH MAIN NEXT EXIT 2-2 SPEAKERS DISTANCE FRONT L : 10 ft 3.0 m FRONT R : 10 ft 3.0 m CENTER : 10 ft 3.0 m SURR.L : 10 ft 3.0 m SURR.R : 10 ft 3.0 m SUB W : 10 ft 3.0 m SURR.B L : 10 ft 3.0 m SURR.B R : 10 ft 3.0 m MAIN RETURN NEXT EXIT 2-3 SPEAKERS LEVEL TEST MODE : MANUAL FRONT L : 0 dB CENTER : 0 dB FRONT R : 0 dB SURR.R : 0 dB SURR.B R : 0 dB SURR.B L : 0 dB SURR.L : 0 dB SUB W : 0 dB MAIN RETURN EXIT SETUP MAIN MENU 1. INPUT SETUP :UNLOCK 2. SPEAKER SETUP:UNLOCK 3. PREFERENCE :UNLOCK 4. SURROUND :UNLOCK 5. PL II MUSIC :UNLOCK 6. CS II :UNLOCK 7. 7.1 CH. INPUT:UNLOCK 8. MULTI ROOM :UNLOCK EXIT * "8. MULTI ROOM" is displayed only with the SR5001. 3 PREFERENCE STANDBY MODE : NORMAL TV-AUTO : DISABLE OSD INFO : ENABLE BILINGUAL : MAIN VIDEO CONVERT HDMI : ENABLE DC TRIGGER MAIN EXIT * "DC TRIGGER" is displayed only with the SR5001. 3-1 VIDEO CONVERT TV : ON DVD : ON VCR1 : ON DSS : ON AUX1 : ON MAIN RETURN EXIT SR5001 only 3-2 DC TIRGGER SETUP DC TRIG DISABLE TV : DVD : VCR1 : DSS : AUX1 : CD : TAPE : CD-R : AUX2 : TUNER: 7.1CH: MAIN RETURN EXIT SR5001 only 8 MULTI ROOM AUDIO : DVD SLEEP TIMER : OFF MULTI:OUT : STEREO MULTI:OFF MSPK : VOL : VARI LEVEL : -90dB --- MAIN ROOM STATUS --- VIDEO:DVD AUDIO:DVD MAIN EXIT 4 SURROUND SURR.MODE :AUTO HT-EQ :OFF LFE LEVEL : MAIN EXIT 5 PL II MUSIC PARAMETER PARAMETER : DEFAULT PANORAMA : OFF DEMENSION : 3 CENTER WIDTH : 3 MAIN EXIT 6 CS II PARAMETER TRUBASS SRS DIALOG : 0 : 0 MAIN EXIT 7 7.1 CH. INPUT LEVEL VIDEO-IN : LAST FRONT L : 0 dB CENTER : 0 dB FRONT R : 0 dB SURR.R : 0 dB SURR.B R : 0 dB SURR.B L : 0 dB SURR.L : 0 dB SUB W : 0 dB MAIN EXIT 25 ENGLISH
-
 1
1 -
2
-
3
-
4
-
5
-
6
-
7
-
8
-
9
-
10
-
11
-
12
-
13
-
14
-
15
-
16
-
17
-
18
-
19
-
20
-
21
-
22
-
 23
23 -
 24
24 -
 25
25 -
 26
26 -
 27
27 -
 28
28 -
 29
29 -
 30
30 -
 31
31 -
 32
32 -
 33
33 -
34
-
35
-
36
-
37
-
38
-
39
-
40
-
41
-
42
-
43
-
44
-
45
-
46
-
47
-
48
-
49
-
50
-
51
-
52
-
53
-
54
-
55
-
56
 |
 |
