Marantz SR7400 SR7400 User Guide - Page 29
Other Function
 |
View all Marantz SR7400 manuals
Add to My Manuals
Save this manual to your list of manuals |
Page 29 highlights
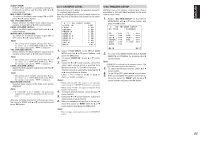
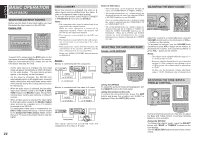
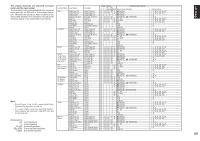
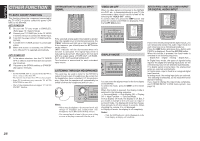
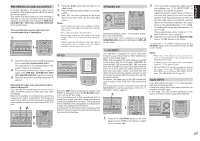
ENGLISH OTHER FUNCTION TV AUTO ON/OFF FUNCTION This function allows the component connected to the TV-VIDEO in jack to control the power (ON/ OFF) to the SR7400. AUTO POWER ON 1. Be sure the TV auto mode is ENABLED. (Refer page 19 : System Setup) 2. Connect your TV TUNER (etc) to the TV-VIDEO in terminal. Be sure to connect the VIDEO input. 3. Turn OFF the power to the TV TUNER and the SR7400. 4. Turn ON the TV TUNER and tune in a receivable station. 5. When the station is received, the SR7400 turns ON and TV is selected automatically. AUTO POWER OFF 1. In the above situation, turn the TV TUNER OFF or select a channel that does not contain any broadcast. 2. The power to the SR7400 switches to STANDBY after approx. 5 minutes. Notes: • AUTO POWER OFF is canceled if the SR7400 is set to a source other than TV. The function reactivates when TV is selected again. • Some TV broadcasts may cause the TV AUTO FUNCTION to turn ON. • The S-Video terminal does not support "TV AUTO ON/OFF" function. ATTENUATION TO ANALOG INPUT SIGNAL PREV MENU TEST 1 7.1CH 4 DISP 7 CLEAR GUIDE CH.SEL 2 ATT 5 OSD 8 0 MUTE EXIT SURR 3 SPK-AB 6 SLEEP 9 MEMO If the selected analog audio input signal is greater than the capable level of internal processing, the "PEAK" indicator will light up on the front display. If this happens, you should press the ATT button on the remote. "ATT" indicator will be illuminated when this function is activated. The signal-input level is reduced by about half. Attenuation will not work with the output signal of TAPE-OUT, CD-R/MDOUT, VCR1-OUT and DSS/VCR2-OUT. This function is memorized for each individual input source. LISTENING THROUGH HEADPHONES This jack may be used to listen to the SR7400's output through a pair of headphones. Be certain that the headphones have a standard 1/4" stereo phono plug. (Note that the speakers will automatically be turned off when the headphone jack is in use.) SELECTOR AV SURROUND RECEIVER SR7400 SELECT STANDBY POWER ON/STANDBY ENTER PHONES CLEAR MEMORY SPEAKERS A/B MULTI TV DVD VCR1 DSS/VCR2 Notes: • When using headphones, the surround mode will change to STEREO and TruSurround (TS) headphones by SURROUND MODE selector. • The surround mode returns to the previous setting as soon as the plug is removed from the jack. VIDEO ON/OFF When no video signal is connected to the SR7400 or a DVD, etc., is connected directly to your TV, the unnecessary video circuit can be turned off by selecting the "VIDEO OFF" setting. To select video off, press the AMP button and press the > button until PAGE4 is displayed. Press the V-OFF (D4) button. M UND RECEIVER SR7400 TER ONES CLEAR DISP MULTI AUTO TUNED SLEEP AUTO SURR DIRECT ST V - OFF NIGHT PEAK ATT DISC 6.1 MTX 6.1 SPKR AB EQ ANALOG DIGITAL PCM SURROUND DIGITAL LCR LFE SL S SR MEMORY TUNING F/P MODE SPEAKERS A/B MULTI MULTI SPEAKER 7.1CH INPUT AUX2 TV DVD VCR1 DSS/VCR2 AUX1 CD-R TAPE CD TUNER USE PAGE 4 D1 D2 D3 D4 D5 CH VOL TUNER CD CD-R MD TAPE 1 AUX1 AUX2 LIGHT RC1400 Learning Remote Controller AMP 2 DISPLAY MODE AV SURROUND RECEIVER SR7400 ENTER PHONES CLEAR DISP MULTI AUTO TUNED SLEEP AUTO SURR DIRECT ST V - OFF NIGHT PEAK ATT DISC 6.1 MT X 6.1 SPKR A B EQ ANALOG DIGITAL PCM SURROUND DIGITAL LCR LFE SL S SR MEMORY TUNING F/P SPEAKERS A/B MULTI MULTI SPEAKER 7.1CH INPUT TV DVD VCR1 DSS/VCR2 AUX1 CD-R TAPE CD PREV MENU TEST 1 7.1CH 4 DISP 7 CLEAR GUIDE CH.SEL 2 ATT 5 OSD 8 0 MUTE EXIT SURR 3 SPK-AB 6 SLEEP 9 MEMO You can select the display mode for the front display of the SR7400. To select this mode, press the DISP. on the remote control. When this button is pressed, the display mode is switched in the following sequence. → Surround Mode → Auto-display Off → Display Off → Input Function → Surround Mode.... In Auto display off mode, the display is off. But, if you make a change to the unit such as input or surround mode, the display will show that change, then go back to off after about 3 seconds. When changing the volume, it is not displayed. In Display off mode, the display is off completely. Notes: • Only the DISP indicator will be illuminated on the front display in display off condition SELECTING ANALOG AUDIO INPUT OR DIGITAL AUDIO INPUT USE PAGE 4 M D1 D2 D3 D4 D5 CH VOL TUNER CD CD-R MD TAPE 1 AUX1 AUX2 LIGHT RC1400 Learning Remote Controller AMP 2 If you have already assigned the digital inputs, you can temporarily select the audio input mode for each input source as following procedures. Press the AMP button and press the > button until PAGE4 is displayed. Press the A/D (D3) button. When this button is pressed, the input mode is switched in the following sequence. → Digital Auto → Digital → Analog → Digital Auto.... In Digital Auto mode, the types of signals being input to the digital and analog input jacks for the selected input source are detected automatically. If no digital signal is being input, the analog input jacks are selected automatically. In Digital mode, input is fixed to an assigned digital input terminal. In analog mode, the analog input jacks are selected. This selecting is temporary, so the result will not be stored in memory. If you need to change the input mode completely, use SYSTEM SETUP in OSD menu system. (see page 18) 26
-
 1
1 -
2
-
3
-
4
-
5
-
6
-
7
-
8
-
9
-
10
-
11
-
12
-
13
-
14
-
15
-
16
-
17
-
18
-
19
-
20
-
21
-
22
-
23
-
 24
24 -
 25
25 -
 26
26 -
 27
27 -
 28
28 -
 29
29 -
 30
30 -
 31
31 -
 32
32 -
 33
33 -
 34
34 -
35
-
36
-
37
-
38
-
39
-
40
-
41
-
42
-
43
-
44
-
45
-
46
-
47
-
48
-
49
-
50
-
51
-
52
 |
 |
