Maytag MEW9530AS Installation Guide - Page 6
Installation Instructions
 |
View all Maytag MEW9530AS manuals
Add to My Manuals
Save this manual to your list of manuals |
Page 6 highlights
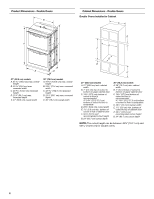
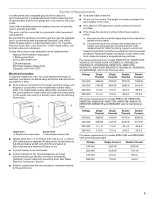
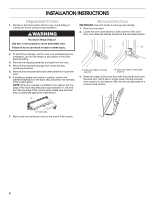
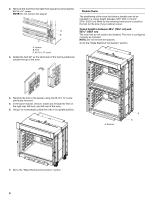
INSTALLATION INSTRUCTIONS Prepare Built-In Oven 1. Decide on the final location for the oven. Avoid drilling or cutting into house wiring during installation. WARNING Excessive Weight Hazard Use two or more people to move and install oven. Failure to do so can result in back or other injury. Remove Oven Door IMPORTANT: Use both hands to remove oven door(s). 1. Open the oven door. 2. Locate the oven door latches in both corners of the oven door, and rotate the latches forward to the unlocked position. A B 2. To avoid floor damage, set the oven onto cardboard prior to installation. Do not use handle or any portion of the front frame for lifting. 3. Remove the shipping materials and tape from the oven. 4. Remove the hardware package from inside the bag containing literature. 5. Remove and set aside racks and other parts from inside the oven. 6. If installing a single oven below a cooktop, remove the adhesive backing from the foam strip and press it to the back of the control panel. NOTE: When the cooktop is installed in the cabinet, the top edge of the foam strip should be approximately ³⁄₈" (10 mm) from the top edge of the control panel. Make sure the foam strip is positioned against the cabinet face. A A. Oven door latch in locked position B. Oven door latch in unlocked position 3. Grasp the edges of the oven door with both hands and close the oven door until it will no longer close. Lift and pull oven door toward you and remove. Set the oven door(s) aside on a covered work surface. A. Foam strip 7. Move oven and cardboard close to the oven's final location. 6
-
 1
1 -
 2
2 -
 3
3 -
 4
4 -
 5
5 -
 6
6 -
 7
7 -
 8
8 -
 9
9 -
 10
10 -
 11
11 -
 12
12 -
13
-
14
-
15
-
16
-
17
-
18
-
19
-
20
-
21
-
22
-
23
-
24
-
25
-
26
-
27
-
28
-
29
-
30
-
31
-
32
 |
 |
