Maytag MGDZ600TK Installation Instructions
Maytag MGDZ600TK - Front Load Gas Dryer Manual
 |
UPC - 883049064994
View all Maytag MGDZ600TK manuals
Add to My Manuals
Save this manual to your list of manuals |
Maytag MGDZ600TK manual content summary:
- Maytag MGDZ600TK | Installation Instructions - Page 1
ELECTRIC (CANADA ONLY) INSTRUCTIONS D'INSTALLATION DE LA SÉCHEUSE À GAZ (É.-U. ET CANADA) ÉLECTRIQUE (CANADA UNIQUEMENT) Para una version de estas intrucciones en español, visite www.Whirlpool.com TABLE OF CONTENTS DRYER SAFETY 2 INSTALLATION REQUIREMENTS 4 Tools and Parts 4 Optional Equipment - Maytag MGDZ600TK | Installation Instructions - Page 2
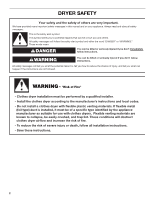
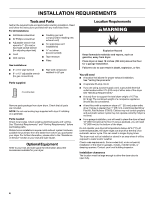
DRYER SAFETY Your safety and the safety of others are very important. We have provided many important safety messages in this manual and on your appliance don't immediately follow instructions. WARNING You can be killed or seriously injured if you don't follow instructions. All safety messages - Maytag MGDZ600TK | Installation Instructions - Page 3
The dryer must be electrically grounded in accordance with local codes, or in the absence of local codes, with the National Electrical Code, ANSI/NFPA 70 or Canadian Electrical Code, CSA C22.1. In the State of Massachusetts, the following installation instructions apply: ■ Installations and repairs - Maytag MGDZ600TK | Installation Instructions - Page 4
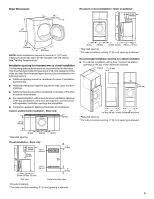
sturdy floor to support the total dryer weight of 127 lbs (57.6 kg). The combined weight of a companion appliance should also be considered. ■ A level floor with a maximum slope of 1" (25 mm) under entire dryer. If slope is greater than 1" (25 mm), install Extended Dryer Feet Kit, Part Number 279810 - Maytag MGDZ600TK | Installation Instructions - Page 5
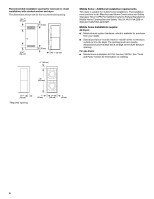
servicing. ■ Additional clearances might be required for wall, door, and floor moldings. ■ Additional spacing should be considered on all sides of the dryer openings are acceptable. ■ Companion appliance spacing should also be considered. Custom undercounter installation - Dryer only 2"* (50 mm) 36 - Maytag MGDZ600TK | Installation Instructions - Page 6
spacing for recessed or closet installation, with stacked washer and dryer The dimensions shown are for the recommended spacing. twice as large as the dryer exhaust opening. For gas dryers ■ Mobile Home Installation Kit Part Number 346764. See "Tools and Parts" section for information on ordering - Maytag MGDZ600TK | Installation Instructions - Page 7
you use Power Supply Cord Replacement Part Number 9831317. For further information, please reference the service numbers located in the "Assistance or Service" section of your Use and Care Guide. GROUNDING INSTRUCTIONS ■ For a grounded, cord-connected dryer: This dryer must be grounded. In the event - Maytag MGDZ600TK | Installation Instructions - Page 8
Service" section. LP gas conversion: Conversion must be made by a qualified technician. No attempt shall be made to convert the appliance valve: In the U.S.A.: An individual manual shutoff valve must be installed within six (6) feet (1.8 m) of the dryer in accordance with the National Fuel Gas - Maytag MGDZ600TK | Installation Instructions - Page 9
wrench to tighten, connect the gas supply to the dryer. Use pipe-joint compound on the threads of all use a metal foil vent. Failure to follow these instructions can result in death or fire. A. Flared flexible heavy metal vent. ■ Review vent system chart. Modify existing vent system if - Maytag MGDZ600TK | Installation Instructions - Page 10
dealer or by calling Whirlpool Service. For more information, see the "Assistance or Service" section. Rigid metal vent Flexible metal vent must be fully extended and supported when the dryer is in its final location. ■ Remove , etc. Housecleaning problems and health problems. Plan Vent System - Maytag MGDZ600TK | Installation Instructions - Page 11
Kit (to cover unused exhaust holes): Part Number W10186596 - all models This dryer can be converted to exhaust out the are shown. Refer to the manufacturer's instructions. A B A. Over-the-top installation "Assistance or Service" section to order. ■ Over-the-Top Installation: Part Number 4396028 - Maytag MGDZ600TK | Installation Instructions - Page 12
the blue film on the console and any tape remaining on the dryer. 7. Wipe the dryer drum interior thoroughly with a damp cloth to remove any dust. 8. Read the "Dryer Use" section in your Use and Care Guide. Electric Models Only 9. For power supply cord installation, plug into a grounded outlet - Maytag MGDZ600TK | Installation Instructions - Page 13
opening, if desired. 1. Place a towel or soft cloth on top of the dryer or work space to avoid damaging the surface. Remove the door assembly 1. Remove the 4 screws that hold the door hinge on the front panel of the dryer. Reverse hinge 1. Use a small flat-blade screwdriver to remove 2 plug strips - Maytag MGDZ600TK | Installation Instructions - Page 14
latches securely. TROUBLESHOOTING First try the solutions suggested here and possibly avoid the cost of a service call... Dryer Operation Dryer will not run the fuse or reset the circuit breaker. If the problem continues, call an electrician. Dryer displaying code message ■ "PF" (power failure), - Maytag MGDZ600TK | Installation Instructions - Page 15
you do not feel air movement, clean exhaust system of lint or replace exhaust vent with heavy metal or flexible metal vent. See the Installation Instructions. ■ Is the dryer located in a closet? Closet doors must have ventilation openings at the top and bottom of the door. The front of the - Maytag MGDZ600TK | Installation Instructions - Page 16
: DANGER Risque possible de décès ou de blessure grave si vous ne suivez pas immédiatement les instructions. AVERTISSEMENT Risque possible de décès ou de blessure grave si vous ne suivez pas les instructions. Tous les messages de sécurité vous diront quel est le danger potentiel et vous disent - Maytag MGDZ600TK | Installation Instructions - Page 17
gaz (homologation UL ou CSA). Pour d'autre information, contacter le fournisseur de gaz local. En cas de détection d'une fuite de gaz, exécuter les instructions "Que faire dans le cas d'une odeur de gaz". IMPORTANT : L'installation du gaz doit se conformer aux codes locaux, ou en l'absence de codes - Maytag MGDZ600TK | Installation Instructions - Page 18
. Lire et suivre les instructions fournies avec les outils indiqu service" de votre Guide d'utilisation et d'entretien. Équipement facultatif Consulter votre Guide . Voir "Spécifications électriques". ■ Un plancher robuste capable de supporter un poids total (sécheuse et charge) de 127 lb (57,6 kg - Maytag MGDZ600TK | Installation Instructions - Page 19
Dimensions de la sécheuse Installation dans un placard - Sécheuse seulement 36" (914 mm) 501⁄2 " (1283 mm) *29" (728 mm) 27" (686 mm) REMARQUE : La plupart des installations requièrent un espace minimum de 5" (127 mm) derrière la sécheuse pour le conduit d'évacuation avec coude. Voir " - Maytag MGDZ600TK | Installation Instructions - Page 20
Espacement recommandé pour l'installation dans un placard ■ Pour installation dans un placard avec porte, on doit prévoir des ouvertures minimum d'entrée d'air au sommet du placard. 7"* (178 mm) 7"* (178 mm) 9"* (229 mm) 5"** 29" 1"* 1" 27" 1" (127 mm) (728 mm) (25 mm) (25 mm)(686 mm) (25 mm) * - Maytag MGDZ600TK | Installation Instructions - Page 21
numéro 9831317 (pièce de rechange). Pour en savoir plus, veuillez vous reporter aux numéros de service qui se trouvent à la section "Assistance ou service" de votre Guide d'utilisation et d'entretien. INSTRUCTIONS DE LIAISON À LA TERRE ■ Pour une sécheuse reliée à la terre et connectée par un cordon - Maytag MGDZ600TK | Installation Instructions - Page 22
de gaz, et le personnel d'entretien autorisé. Le non-respect de ces instructions peut causer un décès, un explosion ou un incendie. Type de gaz Gaz composer les numéros indiqués dans la section "Assistance ou service"de votre Guide d'utilisation et d'entretien. Conversion au gaz de pétrole liqué - Maytag MGDZ600TK | Installation Instructions - Page 23
utiliser un conduit d'évacuation en plastique. Ne pas utiliser un conduit d'évacuation en feuille de métal. Le non-respect de ces instructions peut causer un décès ou un incendie. AVERTISSEMENT : Pour réduire le risque d'incendie, cette sécheuse DOIT ÉVACUER L'AIR À L'EXTÉRIEUR. IMPORTANT : Observer - Maytag MGDZ600TK | Installation Instructions - Page 24
être obtenus chez votre marchand ou en appelant l'assistance Whirlpool. Pour plus de renseignements, consulter la section "Assistance ou service" de votre Guide d'utilisation et d'entretien. Conduit métallique rigide ■ Pour un meilleur rendement de séchage, on recommande d'utiliser des conduits - Maytag MGDZ600TK | Installation Instructions - Page 25
à votre installation. Deux installations à dégagement réduit sont illustrées. Voir les instructions du fabricant. C D A E F G B A. Sécheuse B. Coude dégagement est réduit. Voir la section "Assistance ou service" de votre Guide d'utilisation et d'entretien pour commander. ■ Installation au- - Maytag MGDZ600TK | Installation Instructions - Page 26
NIVELLEMENT AVERTISSEMENT Risque du poids excessif Utiliser deux ou plus de personnes pour déplacer et installer la sécheuse. Le non-respect de cette instruction peut causer une blessure au dos ou d'autre blessure. 1. Afin d'éviter d'endommager le plancher, utiliser une grande pièce de carton de la - Maytag MGDZ600TK | Installation Instructions - Page 27
tambour de la sécheuse avec un chiffon humide pour éliminer toute trace de poussière. 8. Lire "Utilisation de la sécheuse"en la Instructions d'utilisation de la laveuse. Modèles électriques uniquement : 9. Pour l'installation avec cordon d'alimentation, brancher sur une prise reliée à la terre. Mod - Maytag MGDZ600TK | Installation Instructions - Page 28
Inversion de la charnière 1. Utiliser un petit tournevis à lame plate pour enlever 2 tringles des pitons d'obturation des trous de la partie interne de la porte. Faire glisser la tête du tournevis sous les tringles, en veillant à ne pas érafler la surface de la porte interne. Soulever. Inversion de - Maytag MGDZ600TK | Installation Instructions - Page 29
a détecté un problème nécessitant une réparation: Faire un appel de service. Résultats de la sécheuse Le séchage des vêtements n'est pas satisfaisant, un conduit d'évacuation en feuille de métal. Le non-respect de ces instructions peut causer un décès ou un incendie. ■ Le conduit d'évacuation ou - Maytag MGDZ600TK | Installation Instructions - Page 30
nécessaire à l'avant de la sécheuse, et pour la plupart des installations, un espacement minimum de 5" (127 mm) est nécessaire à l'arrière de la sécheuse. Voir "Instructions d'installation". 30 - Maytag MGDZ600TK | Installation Instructions - Page 31
NOTES 31 - Maytag MGDZ600TK | Installation Instructions - Page 32
W10261613A W10267630A - SP © 2009 Whirlpool Corporation. All rights reserved. 11/09 Printed in U.S.A.
-
 1
1 -
 2
2 -
 3
3 -
 4
4 -
 5
5 -
 6
6 -
 7
7 -
8
-
9
-
10
-
11
-
12
-
13
-
14
-
15
-
16
-
17
-
18
-
19
-
20
-
21
-
22
-
23
-
24
-
25
-
26
-
27
-
28
-
29
-
30
-
31
-
32
 |
 |

DRYER INSTALLATION INSTRUCTIONS
GAS (U.S.A. AND CANADA)
ELECTRIC (CANADA ONLY)
INSTRUCTIONS D’INSTALLATION DE LA SÉCHEUSE
À GAZ (É.-U. ET CANADA)
ÉLECTRIQUE (CANADA UNIQUEMENT)
TABLE OF CONTENTS
DRYER SAFETY
..............................................................................
2
INSTALLATION REQUIREMENTS
................................................
4
Tools and Parts
............................................................................
4
Optional Equipment
.....................................................................
4
Location Requirements
................................................................
4
ELECTRIC DRYER POWER HOOKUP – CANADA ONLY
..........
7
Electrical Requirements
...............................................................
7
GAS DRYER POWER HOOKUP
....................................................
8
Gas Supply Requirements
...........................................................
8
Make Gas Connection
.................................................................
9
VENTING
.........................................................................................
9
Venting Requirements
..................................................................
9
Plan Vent System
.......................................................................
10
Install Vent System
.....................................................................
12
INSTALL LEVELING LEGS
...........................................................
12
CONNECT VENT
...........................................................................
12
LEVEL DRYER
..............................................................................
12
COMPLETE INSTALLATION
.......................................................
12
REVERSE DOOR SWING
.............................................................
13
TROUBLESHOOTING
..................................................................
14
Dryer Operation
..........................................................................
14
Dryer Results
..............................................................................
15
TABLE DES MATIÈRES
SÉCURITÉ DE LA SÉCHEUSE
....................................................
16
EXIGENCES D’INSTALLATION
...................................................
18
Outillage et pièces
......................................................................
18
Équipement facultatif
.................................................................
18
Exigences d'emplacement
.........................................................
18
RACCORDEMENT DE L’ALIMENTATION À LA
SÉCHEUSE ÉLECTRIQUE
...........................................................
21
Spécifications électriques
..........................................................
21
RACCORDEMENT DE L’ALIMENTATION
À LA SÉCHEUSE À GAZ
..............................................................
22
Alimentation en gaz
....................................................................
22
Raccordement au gaz
................................................................
23
ÉVACUATION
................................................................................
23
Exigences concernant l’évacuation
...........................................
23
Planification du système d’évacuation
......................................
25
Installation du système d’évacuation
.........................................
26
INSTALLATION DES PIEDS DE NIVELLEMENT
........................
26
RACCORDEMENT DU CONDUIT D’ÉVACUATION
..................
26
RÉGLAGE DE L’APLOMB DE LA SÉCHEUSE
...........................
27
INVERSION DU SENS D’OUVERTURE DE LA PORTE
.............
27
ACHEVER L’INSTALLATION
.......................................................
27
DÉPANNAGE
.................................................................................
29
Fonctionnement de la sécheuse
................................................
29
Résultats de la sécheuse
...........................................................
29
W10261613A
W10267630A - SP
Para una version de estas intrucciones en español, visite www.Whirlpool.com