Maytag MHW6630MBK Owners Manual - Page 13
INSTALLATION, Unpacking, Connect Drain Hose
 |
View all Maytag MHW6630MBK manuals
Add to My Manuals
Save this manual to your list of manuals |
Page 13 highlights
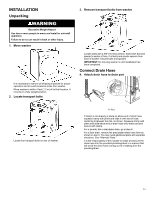
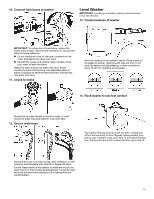
INSTALLATION Unpacking WARNING Excessive Weight Hazard Use two or more people to move and install or uninstall appliance. Failure to do so can result in back or other injury. 1. Move washer It is necessary to remove all shipping materials for proper operation and to avoid excessive noise from washer. Move washer to within 4 feet (1.2 m) of its final location. It must be in a fully upright position. 2. Locate transport bolts Locate four transport bolts on rear of washer. 3. Remove transport bolts from washer Loosen bolts with a 5/8" (16 mm) wrench. Slide each bolt and spacer to center of hole. Pull bolts and plastic spacers from back of washer. Discard bolts and spacers. IMPORTANT: Do not plug washer in until installation has been completed. Connect Drain Hose 4. Attach drain hose to drain port A A- Ribs If clamp is not already in place on elbow end of drain hose, squeeze clamp with pliers and slide it over end of hose, centering it between the ribs, as shown. Squeeze clamp with pliers and slide elbow end of drain hose onto drain port and secure with clamp. For a laundry tub or standpipe drain, go to step 6. For a floor drain, remove the preinstalled drain hose form as shown in step 5. You may need additional parts with separate directions. See "Alternate Parts." It is the responsibility of the installer to install and secure the drain hose into the provided plumbing/drain in a manner that will avoid the drain hose coming out of or leaking from the plumbing/drain. 13
-
 1
1 -
2
-
3
-
4
-
5
-
6
-
7
-
 8
8 -
 9
9 -
 10
10 -
 11
11 -
 12
12 -
 13
13 -
 14
14 -
 15
15 -
 16
16 -
 17
17 -
 18
18 -
19
-
20
-
21
-
22
-
23
-
24
-
25
-
26
-
27
-
28
-
29
-
30
-
31
-
32
 |
 |
