Motorola 56566 User Guide - Page 17
The Select Installation Folder screen opens. A, The User Information screen opens. Enter your
 |
UPC - 723755565661
View all Motorola 56566 manuals
Add to My Manuals
Save this manual to your list of manuals |
Page 17 highlights
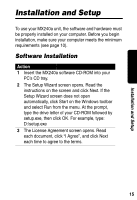
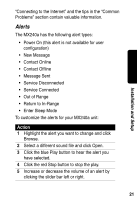
Installation and Setup Action 4 The User Information screen opens. Enter your name and organization and click Next. Note: if you are using Windows 2000 or Windows XP, you may be asked whether you want to allow shared access to the MX240a application. Based on your selection, you can restrict access to the administrator only or allow access to anyone who uses the computer. 5 The Select Installation Folder screen opens. A location to install the software will be suggested. If this is the location you want, click Next. If you want to use a different location, click Browse, navigate to the desired location, and click OK. Then click Next. 6 The Options screen opens. Read the option descriptions and make any changes. When finished, click Next. 7 The Confirm Installation screen opens. Click Next. 8 The Installation Complete screen opens. Click Finish to complete the installation. 9 Remove the CD-ROM and restart your computer. If you selected the option for a shortcut to be created, you will see the MX240a icon on your desktop. Double click the icon to launch the application. If you do not see the MX240a icon on your desktop, click Start on the Windows taskbar and select MX240a in the Programs list to launch the application. 16
-
 1
1 -
2
-
3
-
4
-
5
-
6
-
7
-
8
-
9
-
10
-
11
-
 12
12 -
 13
13 -
 14
14 -
 15
15 -
 16
16 -
 17
17 -
 18
18 -
 19
19 -
 20
20 -
 21
21 -
 22
22 -
23
-
24
-
25
-
26
-
27
-
28
-
29
-
30
-
31
-
32
-
33
-
34
-
35
-
36
-
37
-
38
-
39
-
40
-
41
-
42
-
43
-
44
-
45
-
46
-
47
-
48
-
49
-
50
-
51
-
52
 |
 |
