NEC 60XC10 42XC10 50XC10 60XC10 user's manual - Page 12
Part Names and Functions
 |
View all NEC 60XC10 manuals
Add to My Manuals
Save this manual to your list of manuals |
Page 12 highlights
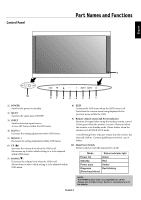
Control Panel Part Names and Functions English 9 ON OFF 10 87 6 5 4 3 2 1 1) POWER Switches the power on/standby. 2) MUTE Switches the audio mute ON/OFF. 3) INPUT Switches between input sources. Acts as SET button within the OSD menu. 4) PLUS (+) Increases the setting adjustment within OSD menu. 5) MINUS (-) Decreases the setting adjustment within OSD menu. 6) UP ( ) Increases the volume level when the OSD is off. Moves area up to select which setting to is to be adjusted within OSD menu. 7) DOWN ( ) Decreases the volume level when the OSD is off. Moves down to select which setting is to be adjusted within OSD menu. 8) EXIT Activates the OSD menu when the OSD menu is off. Exits from the current menu being displayed to the previous menu within the OSD. 9) Remote control sensor and Power indicator Receives the signal when using the wireless remote control. Glows green when the monitor is active. Glows red when the monitor is in Standby mode. Glows Amber when the monitor is in POWER SAVE mode. A red blinking Power indicator means that the monitor has detected a failure. Contact qualified personnel in case of failure. 10) Main Power Switch Seesaw switch to turn the main power on/off. Mode Power On Standby Power save Diagnosis (Detecting failure) Status indicator light Green Red Amber Red blinking NOTE: The POWER button does not completely turn off the display. Use the Main Power Switch to completely turn off the display. English-9
-
 1
1 -
2
-
3
-
4
-
5
-
6
-
 7
7 -
 8
8 -
 9
9 -
 10
10 -
 11
11 -
 12
12 -
 13
13 -
 14
14 -
 15
15 -
 16
16 -
 17
17 -
18
-
19
-
20
-
21
-
22
-
23
-
24
-
25
-
26
-
27
-
28
-
29
-
30
-
31
-
32
-
33
-
34
-
35
-
36
-
37
-
38
-
39
-
40
-
41
 |
 |
