NEC 60XC10 42XC10 50XC10 60XC10 user's manual - Page 15
Power
 |
View all NEC 60XC10 manuals
Add to My Manuals
Save this manual to your list of manuals |
Page 15 highlights
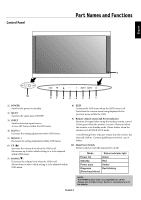
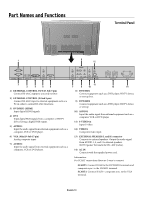
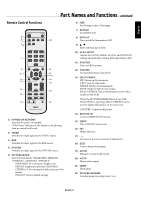
Part Names and Functions - continued POWER To turn the unit ON and OFF: 1. Plug the power cord into an AC outlet. 2. Press the Power button (on the unit). The monitor's ON/STANDBY indicator turns red and the unit will be in STANDBY mode. 3. Press the POWER ON button on the remote control. The ON/STANDBY indicator will turn green when the unit is active. 4. Press the STANDBY button (on the remote) or the Power button (on the unit) to turn off the monitor. Main Power Switch Cover Included with the display is a cover for the Main Power Switch. Use this cover to prevent the unit from being inadvertently powered off. Place the tab on the cable cover into the rectangular slot on the display. Then using the screw provided, secure the cover to the display. DISPLAY To check display settings press the DISPLAY button on the remote. The screen changes each time the DISPLAY button is pressed. Display information will disappear after 3 seconds. ON OFF DIGITAL ZOOM Digital zoom can change the picture position or enlarge the image on the screen. 1. Be sure ZOOM NAV function is off. Press the ZOOM button (+ or -) to display the magnifying glass. Press the ZOOM + button to enlarge the image. Press the ZOOM - button to reduce the image. Press the UP and DOWN or PLUS and MINUS buttons to reposition the picture. 2. Press the POINTER button to hide the pointer. SLOT TAB Main Power Switch Cover POINTER Use the Pointer to point to a specific area on the screen. Press the UP and DOWN or PLUS and MINUS buttons to reposition the Pointer. English-12
-
 1
1 -
2
-
3
-
4
-
5
-
6
-
7
-
8
-
9
-
 10
10 -
 11
11 -
 12
12 -
 13
13 -
 14
14 -
 15
15 -
 16
16 -
 17
17 -
 18
18 -
 19
19 -
 20
20 -
21
-
22
-
23
-
24
-
25
-
26
-
27
-
28
-
29
-
30
-
31
-
32
-
33
-
34
-
35
-
36
-
37
-
38
-
39
-
40
-
41
 |
 |
