NEC 60XC10 42XC10 50XC10 60XC10 user's manual - Page 16
Remote Control ID Function
 |
View all NEC 60XC10 manuals
Add to My Manuals
Save this manual to your list of manuals |
Page 16 highlights
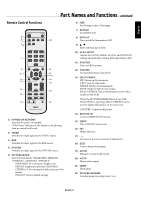
English Part Names and Functions - continued Remote Control ID Function REMOTE CONTROL ID The remote control included with the display can be used to control up to 26 individual monitors using what is called the REMOTE CONTROL ID mode. The REMOTE CONTROL ID mode works in conjunction with the Monitor ID, allowing control of up to 26 individual monitors. For example: if there are many monitors being used in the same area, a remote control in normal mode would send signals to every monitor at the same time Figure 1. Using the remote in REMOTE CONTROL ID mode will only operate one specific monitor within the group Figure 2. Monitor ID:1 Monitor ID:2 Monitor ID:3 Remote works Remote works Remote works TO SET REMOTE CONTROL ID: While holding down the REMOTE ID SET button on the remote control, use the KEYPAD to input the Monitor ID (1-26) of the display to be controlled via remote. The remote can then be used to operate the monitor having that specific Monitor ID number. When 0 is selected or when the remote control is in normal mode, all monitors will be operated. TO USE REMOTE CONTROL ID MODE ID Mode - To enter ID Mode press the REMOTE ID SET button and hold down for 2 seconds. Normal Mode - To return to Normal Mode press the REMOTE ID RESET button and hold down for 2 seconds. In order for this feature to work properly, the display must be assigned a Monitor ID number. The Monitor ID number can be assigned under the SETUP menu in the OSD (See page 17). If Monitor ID is set to "ALL" , monitor is controled by remote control not depend on remote ID. Figure 1 Remote in Normal mode or the REMOTE ID is set to 0 Monitor ID:1 Remote does not work Monitor ID:2 Monitor ID:3 Remote does not work Remote works Figure 2 Remote set up to use Remote ID:3 English-13
-
 1
1 -
2
-
3
-
4
-
5
-
6
-
7
-
8
-
9
-
10
-
 11
11 -
 12
12 -
 13
13 -
 14
14 -
 15
15 -
 16
16 -
 17
17 -
 18
18 -
 19
19 -
 20
20 -
 21
21 -
22
-
23
-
24
-
25
-
26
-
27
-
28
-
29
-
30
-
31
-
32
-
33
-
34
-
35
-
36
-
37
-
38
-
39
-
40
-
41
 |
 |
