NEC 8M-B120C 8M-B120C Quick Start Setup Guide - Page 11
Part Names
 |
View all NEC 8M-B120C manuals
Add to My Manuals
Save this manual to your list of manuals |
Page 11 highlights
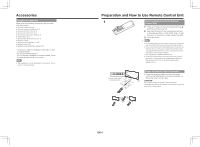
Part Names Parts of the Monitor QQFront Remote control light receiving section => Page EN 4 • Point the remote control unit toward this part. QQMain body controls Power button MENU button INPUT button • On the Setup menu => "Enter" button ∧ forward/∨ backward buttons • On the Setup menu => "Upward/Downward cursor" button • "∧" button functions as "Upward cursor", and "∨" button functions as "Downward cursor". Volume (+/-) buttons • On the Setup menu => "Right/Left cursor" button • "+" button functions as "Right cursor", and "-" button functions as "Left cursor". POWER lamp • White: ON • Off: Power OFF QQRear Input8 (HDMI) • 8K signal terminal Headphone jack (φ3.5 stereo mini jack) • Audio can be output from the speakers even when headphones are connected. (Refer to "Menu Operation" in the built-in Operation Manual.) USB1 terminal • Use this terminal to view photos, music, and video stored in USB memory. USB2 terminal Input 1 to 4 (HDMI) Analog audio output terminal (φ3.5 stereo mini jack) Input 7 A~D (HDMI x 4) • 8K signal terminal Input 6 Digital audio output terminal (optical) Input 5 • AV INPUT • AUDIO IN FOR INPUT1/INPUT6/INPUT7/INPUT8 LAN terminal (10BASE-T/100BASE-TX) • Use this terminal for IP control, etc. EN 9 POLSKI ITALIANO DEUTSCH FRANÇAIS ESPAÑOL ENGLISH
-
 1
1 -
2
-
3
-
4
-
5
-
 6
6 -
 7
7 -
 8
8 -
 9
9 -
 10
10 -
 11
11 -
 12
12 -
 13
13 -
 14
14 -
 15
15 -
 16
16 -
17
-
18
-
19
-
20
-
21
-
22
-
23
-
24
-
25
-
26
-
27
-
28
-
29
-
30
-
31
-
32
-
33
-
34
-
35
-
36
-
37
-
38
 |
 |
