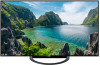
NEC 8M-B80AX1U 8M-B80AX1U Setup Manual - Page 8
Attaching the Stand
 |
View all NEC 8M-B80AX1U manuals
Add to My Manuals
Save this manual to your list of manuals |
Page 8 highlights
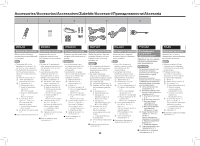
Attaching the Stand 1 2 3 - 3 CAUTION 4 • Since this product is heavy, be sure that it is unpacked and carried by at least two people. Carrying it by yourself may lead to injury. • Use a commercially available screwdriver and tighten the screws securely. • When using an electric screwdriver, set the tightening torque to 2.0 N·m (20 kgf·cm). Assembly of the Stand Unit 1 Place the TOP-C packaging material on a level surface as shown in the illustration below. 2 Install the stand mounting brackets into the grooves of the packaging material. • Pay attention to their right/left sides and orientation. 3 Remove the front cover of the stand base and install it according to the shape of the packaging material. • Remove 2 screws on the stand base. • Slide the front cover along the shape of the stand base. 6 EN 2 Gap between the cover and metal: About 1.6mm 4 Fix the stand base and stand mounting brackets using the 8 screws (large) for stand assembly. Then, attach the front cover. • Slide the front cover along the shape of the stand base. • Slide and attach the front cover in the arrow direction in such way that the "projections on the rear surface of the front cover" are put into the "tabs on the rear cover". • Fix the front cover using 2 screws that have been removed in Step 3 above. • Do not use an electric screwdriver for these screws. Tighten them slowly with your hand. 5 Prepare a table and lay the display down on it. • To prevent damage to the LCD panel and LED part, place a soft cloth such as a blanket on the table, etc. and lay the display down on it. • Do not remove the protective sheet of the main body until the completion of the installation. 6 Insert the stand and fix it using 4 mounting screws (small) for the stand. The attaching of the stand is now complete. When standing the TV main body upright • Be careful not to press the TV screen too hard with fingers. When removing the stand • When moving this Monitor to another location, remove the stand using the reverse order of the attaching procedures in "Attaching the Stand". Be careful of the projection on the LED part of the front side of the display. • To prevent damage to the LCD panel and LED part, place a soft cloth such as a blanket on a table, etc. and place this Monitor on it. POLSKI ITALIANO DEUTSCH FRANÇAIS ESPAÑOL ENGLISH
-
 1
1 -
2
-
 3
3 -
 4
4 -
 5
5 -
 6
6 -
 7
7 -
 8
8 -
 9
9 -
 10
10 -
 11
11 -
 12
12 -
 13
13 -
14
-
15
-
16
-
17
 |
 |
