Netgear FSM726S FSM726S User Manual - Page 20
Step 5: Checking the Installation, Step 6: Applying AC Power, Step 7: Connecting to the Console Port
 |
UPC - 606449023091
View all Netgear FSM726S manuals
Add to My Manuals
Save this manual to your list of manuals |
Page 20 highlights
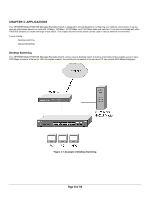
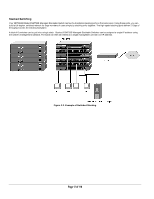
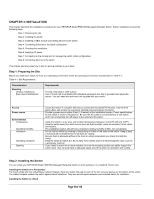
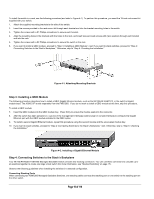
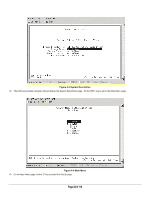
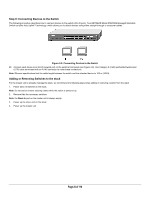
Connect Straight-in To prevent bent pins, do not install the stack port cable connector at an angle. Use extra care to insert the cable connector straight into the switch's stacking connector. The following procedure describes how to stack three FSM726S Managed Stackable Switches and Figure 4-3 shows these connections: 11. Connect either end of the supplied stacking cable to the Stack In connector on the first switch. Connect the other end of the cable to the Stack Out connector on the second switch. 12. Connect either end of another stacking cable to the Stack In connector on the second switch. Connect the other end of the cable to the Stack Out connector on the third switch. The third switch will be the master switch. Note: Stacked FSM726S Switches can be assigned a single IP address using the switches' management software. The stack can then be treated as a single manageable unit with one IP address. The switch with that IP address is considered the master unit, while the other switches in the stack are called slave units. Note: The switch that is acting as the master unit should have the Stack In port empty. Figure 4-3. Cabling Three FSM726S Stacked Switches Step 5: Checking the Installation Before you apply power: o Inspect the equipment thoroughly. o Verify that all cables are installed correctly. o Check cable routing to make sure cables are not damaged or create a safety hazard. o Be sure all equipment is mounted properly and securely. Step 6: Applying AC Power NETGEAR Model FSM726S Managed Stackable Switches do not have an ON/OFF switch; the only method of applying or removing AC power is by connecting or disconnecting the power cord. Before you connect the power cord, select an AC outlet that is not controlled by a wall switch, which can turn off power to the switch. After you select an appropriate outlet, use the following procedure to apply AC power. 13. Connect the female end of the supplied AC power adapter cable to the power receptacle on the back of the switch. 14. Connect the 3-pronged end of the AC power adapter cable to a grounded 3-pronged AC outlet. When you apply power, the Power LED on the switch's front panel will be Yellow, as it conducts a Power On Self Test (POST). After the switch passes the POST, the Power LED will change to Green and the switch is functional and ready to pass data. If the Power LED does not go on, check that the power cable is plugged in correctly and that the power source is good. If this does not resolve the problem, refer to Appendix B, Troubleshooting. Note: If you are powering up stacked FSM762 switches, power up the master unit last. Step 7: Connecting to the Console Port to Manage the Switch (initial configuration) Your NETGEAR Model FSM726S Managed Stackable Switch contains software for viewing, changing, and monitoring the way it works. This management software is not required for the switch to work. You can use the 10/100 Mbps ports, the built-in RJ-45 Gigabit ports, and the stacking ports without using the management software. However, the management software can let you improve the efficiency of the switch and, as a result, improve its overall performance as well as the performance of your network. The remainder of this section describes how to initialize the management software to the first time you use the management features. Page 20 of 110
-
 1
1 -
2
-
3
-
4
-
5
-
6
-
7
-
8
-
9
-
10
-
11
-
12
-
13
-
14
-
 15
15 -
 16
16 -
 17
17 -
 18
18 -
 19
19 -
 20
20 -
 21
21 -
 22
22 -
 23
23 -
 24
24 -
 25
25 -
26
-
27
-
28
-
29
-
30
-
31
-
32
-
33
-
34
-
35
-
36
-
37
-
38
-
39
-
40
-
41
-
42
-
43
-
44
-
45
-
46
-
47
-
48
-
49
-
50
-
51
-
52
-
53
-
54
-
55
-
56
-
57
-
58
-
59
-
60
-
61
-
62
-
63
-
64
-
65
-
66
-
67
-
68
-
69
-
70
-
71
-
72
-
73
-
74
-
75
-
76
-
77
-
78
-
79
-
80
-
81
-
82
-
83
-
84
-
85
-
86
-
87
-
88
-
89
-
90
-
91
-
92
-
93
-
94
-
95
-
96
-
97
-
98
-
99
-
100
-
101
-
102
-
103
-
104
-
105
-
106
-
107
-
108
-
109
-
110
 |
 |
