Netgear RNR4425 RND4000 User Manual - Page 36
Appendix A, RAID Levels Simplified, Taking and, Scheduling Snapshots
 |
UPC - 606449055948
View all Netgear RNR4425 manuals
Add to My Manuals
Save this manual to your list of manuals |
Page 36 highlights
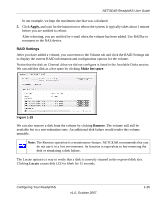
NETGEAR ReadyNAS User Guide . Figure 1-27 To add a volume: 1. Select the hard disks. In this example, we select the first three disks and elect not to specify any of them as a hot spare. 2. Select the RAID level. RAID level determines how the redundancy, capacity utilization, and performance are implemented for the volume. See Appendix A, "RAID Levels Simplified," for more information. Typically in a configuration of three or more disks, RAID level 5 is recommended. In our example, we selected RAID level 5 for the three selected disks. 3. Specify the reserve space for a snapshot. Next, select the percentage of the volume you wish to allocate for snapshots. You can specify 0 if you wish to disable snapshot capability, or you can specify a percentage in 5 percent increments from 5 to 50 percent. The percentage represents the amount of data you think changes while the snapshot is active. This typically depends on how often you schedule your snapshot to occur (see "Taking and Scheduling Snapshots" on page 1-28), and the maximum amount of data (plus padding) you think changes during that time. Make sure to allocate enough space for a worst case as the snapshot becomes unusable when its reserved space runs out. In our example, we selected 10 percent of the volume to be reserved for snapshots. Note: If you do not reserve any space for snapshots, the snapshot tab is not displayed in the Volume tab. 4. Specify the desired volume size. After you specify the volume parameters, enter the appropriate volume size-if you wish to configure a smaller volume size than the maximum displayed. The resulting volume will be approximately the size that is specified. 1-24 v1.0, October 2007 Configuring Your ReadyNAS
-
 1
1 -
2
-
3
-
4
-
5
-
6
-
7
-
8
-
9
-
10
-
11
-
12
-
13
-
14
-
15
-
16
-
17
-
18
-
19
-
20
-
21
-
22
-
23
-
24
-
25
-
26
-
27
-
28
-
29
-
30
-
 31
31 -
 32
32 -
 33
33 -
 34
34 -
 35
35 -
 36
36 -
 37
37 -
 38
38 -
 39
39 -
 40
40 -
 41
41 -
42
-
43
-
44
-
45
-
46
-
47
-
48
-
49
-
50
-
51
-
52
-
53
-
54
-
55
-
56
-
57
-
58
-
59
-
60
-
61
-
62
-
63
-
64
-
65
-
66
-
67
-
68
-
69
-
70
-
71
-
72
-
73
-
74
-
75
-
76
-
77
-
78
-
79
-
80
-
81
-
82
-
83
-
84
-
85
-
86
-
87
-
88
-
89
-
90
-
91
-
92
-
93
-
94
-
95
-
96
-
97
-
98
-
99
-
100
-
101
-
102
-
103
-
104
-
105
-
106
-
107
-
108
-
109
-
110
-
111
-
112
-
113
-
114
-
115
-
116
-
117
-
118
-
119
-
120
 |
 |
