Netgear RNR4425 RND4000 User Manual - Page 37
Apply, Make hot spare, Remove, Locate, RAID Settings
 |
UPC - 606449055948
View all Netgear RNR4425 manuals
Add to My Manuals
Save this manual to your list of manuals |
Page 37 highlights
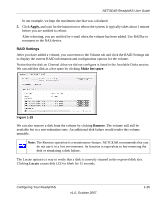
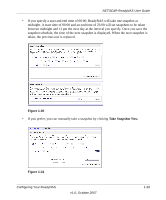
NETGEAR ReadyNAS User Guide In our example, we kept the maximum size that was calculated. 5. Click Apply, and wait for the instruction to reboot the system. It typically takes about 1 minute before you are notified to reboot. After rebooting, you are notified by e-mail when the volume has been added. Use RAIDar to reconnect to the NAS device. RAID Settings After you have added a volume, you can return to the Volume tab and click the RAID Settings tab to display the current RAID information and configuration options for the volume. Notice that the disk on Channel 4 that we did not configure is listed in the Available Disks section. We can add this disk as a hot spare by clicking Make hot spare. Figure 1-28 We can also remove a disk from the volume by clicking Remove. The volume will still be available but in a non-redundant state. An additional disk failure would render this volume unusable. Note: The Remove operation is a maintenance feature. NETGEAR recommends that you do not use it in a live environment. Its function is equivalent to hot-removing the disk or simulating a disk failure. The Locate option is a way to verify that a disk is correctly situated in the expected disk slot. Clicking Locate causes disk LED to blink for 15 seconds. Configuring Your ReadyNAS v1.0, October 2007 1-25
-
 1
1 -
2
-
3
-
4
-
5
-
6
-
7
-
8
-
9
-
10
-
11
-
12
-
13
-
14
-
15
-
16
-
17
-
18
-
19
-
20
-
21
-
22
-
23
-
24
-
25
-
26
-
27
-
28
-
29
-
30
-
31
-
 32
32 -
 33
33 -
 34
34 -
 35
35 -
 36
36 -
 37
37 -
 38
38 -
 39
39 -
 40
40 -
 41
41 -
 42
42 -
43
-
44
-
45
-
46
-
47
-
48
-
49
-
50
-
51
-
52
-
53
-
54
-
55
-
56
-
57
-
58
-
59
-
60
-
61
-
62
-
63
-
64
-
65
-
66
-
67
-
68
-
69
-
70
-
71
-
72
-
73
-
74
-
75
-
76
-
77
-
78
-
79
-
80
-
81
-
82
-
83
-
84
-
85
-
86
-
87
-
88
-
89
-
90
-
91
-
92
-
93
-
94
-
95
-
96
-
97
-
98
-
99
-
100
-
101
-
102
-
103
-
104
-
105
-
106
-
107
-
108
-
109
-
110
-
111
-
112
-
113
-
114
-
115
-
116
-
117
-
118
-
119
-
120
 |
 |