Netgear RNR4425 RND4000 User Manual - Page 49
Setting Share Access in User and Domain Modes, Share Access Restriction.
 |
UPC - 606449055948
View all Netgear RNR4425 manuals
Add to My Manuals
Save this manual to your list of manuals |
Page 49 highlights
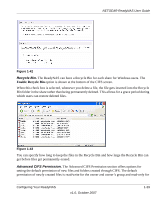
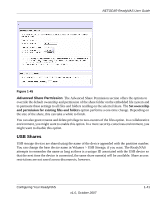
NETGEAR ReadyNAS User Guide For example, select read-only for Default Access and list the hosts you wish to allow access to. Access from all other hosts will be denied. To allow only host 192.168.2.101 read-only access to the share, specify the following: • Default: Read-only • Hosts allowed access: 192.168.2.101 Multiple hosts can be separated with commas (see Appendix B, "Input Field Format" for information about valid host formats.) For example, if you wish to limit share access to particular hosts, you can enter host IP addresses or valid DNS hostnames in the Host allowed access field. In addition, you can enter a range of hosts using common IP range expressions such as: 192.168.2., 192.168.2.0/255.255.255.0, 192.168.2.0/24 These designations all allow hosts with IP addresses 192.168.2.1 through 192.168.2.254. Toward the bottom of the CIFS screen are the Share Display Option, Recycle Bin, and Advanced CIFS Permissions. Refer to the descriptions for these options in the sections that follow. Setting Share Access in User and Domain Modes In User or Domain modes, the CIFS screen looks like the following (note the addition of Readonly and Write-enabled user and group fields) Figure 1-41 Share Access Restriction. If you wish to limit share access to particular users and/or groups, you can enter their names in the Read-only users, Read-only groups, Write-enabled users, and Write-enabled group fields. The names must be valid accounts, either on the ReadyNAS or on the domain controller. For instance, if you wish to allow read-only access to all and read/write access only user fred and group engr, you would set the following: Configuring Your ReadyNAS v1.0, October 2007 1-37
-
 1
1 -
2
-
3
-
4
-
5
-
6
-
7
-
8
-
9
-
10
-
11
-
12
-
13
-
14
-
15
-
16
-
17
-
18
-
19
-
20
-
21
-
22
-
23
-
24
-
25
-
26
-
27
-
28
-
29
-
30
-
31
-
32
-
33
-
34
-
35
-
36
-
37
-
38
-
39
-
40
-
41
-
42
-
43
-
 44
44 -
 45
45 -
 46
46 -
 47
47 -
 48
48 -
 49
49 -
 50
50 -
 51
51 -
 52
52 -
 53
53 -
 54
54 -
55
-
56
-
57
-
58
-
59
-
60
-
61
-
62
-
63
-
64
-
65
-
66
-
67
-
68
-
69
-
70
-
71
-
72
-
73
-
74
-
75
-
76
-
77
-
78
-
79
-
80
-
81
-
82
-
83
-
84
-
85
-
86
-
87
-
88
-
89
-
90
-
91
-
92
-
93
-
94
-
95
-
96
-
97
-
98
-
99
-
100
-
101
-
102
-
103
-
104
-
105
-
106
-
107
-
108
-
109
-
110
-
111
-
112
-
113
-
114
-
115
-
116
-
117
-
118
-
119
-
120
 |
 |
