Netgear WN121T WN121T User Manual - Page 28
Setting up a Profile to Connect to an Access Point or Router
 |
UPC - 606449049350
View all Netgear WN121T manuals
Add to My Manuals
Save this manual to your list of manuals |
Page 28 highlights
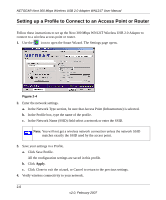
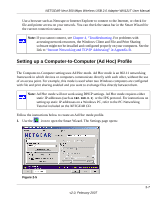
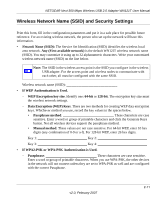
NETGEAR Next 300 Mbps Wireless USB 2.0 Adapter WN121T User Manual Setting up a Profile to Connect to an Access Point or Router Follow these instructions to set up the Next 300 Mbps WN121T Wireless USB 2.0 Adapter to connect to a wireless access point or router. 1. Use the icon to open the Smart Wizard. The Settings page opens. Figure 2-4 2. Enter the network settings. a. In the Network Type section, be sure that Access Point (Infrastructure) is selected. b. In the Profile box, type the name of the profile. c. In the Network Name (SSID) field select a network or enter the SSID. Note: You will not get a wireless network connection unless the network SSID matches exactly the SSID used by the access point. 3. Save your settings in a Profile. a. Click Save Profile. All the configuration settings are saved in this profile. b. Click Apply. c. Click Close to exit the wizard, or Cancel to return to the previous settings. 4. Verify wireless connectivity to your network. 2-6 v2.0, February 2007
-
 1
1 -
2
-
3
-
4
-
5
-
6
-
7
-
8
-
9
-
10
-
11
-
12
-
13
-
14
-
15
-
16
-
17
-
18
-
19
-
20
-
21
-
22
-
 23
23 -
 24
24 -
 25
25 -
 26
26 -
 27
27 -
 28
28 -
 29
29 -
 30
30 -
 31
31 -
 32
32 -
 33
33 -
34
-
35
-
36
-
37
-
38
-
39
-
40
-
41
-
42
-
43
-
44
-
45
-
46
-
47
-
48
-
49
-
50
-
51
-
52
 |
 |
