Netgear WNR2000-100NAS WNR2000 User Manual - Page 48
Connecting Additional Wireless Client Devices after WPS Setup, Adding Additional WPS-Enabled Clients
 |
View all Netgear WNR2000-100NAS manuals
Add to My Manuals
Save this manual to your list of manuals |
Page 48 highlights
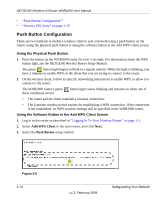
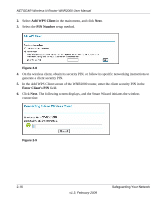
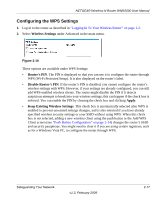
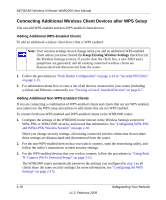
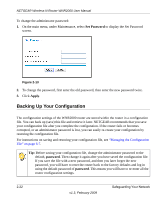
NETGEAR Wireless-N Router WNR2000 User Manual Connecting Additional Wireless Client Devices after WPS Setup You can add WPS-enabled and non-WPS-enabled client devices. Adding Additional WPS-Enabled Clients To add an additional wireless client device that is WPS enabled: Note: Your wireless settings do not change when you add an additional WPS-enabled client unless you have cleared the Keep Existing Wireless Settings check box (in the Wireless Settings screen). If you do clear the check box, a new SSID and a passphrase are generated, and all existing connected wireless clients are disassociated and disconnected from the router. 1. Follow the procedures in "Push Button Configuration" on page 2-14 or "Security PIN Entry" on page 2-15. 2. For information about how to view a list of all devices connected to your router (including wireless and Ethernet-connected), see "Viewing a List of Attached Devices" on page 6-7. Adding Additional Non-WPS-Enabled Clients If you are connecting a combination of WPS-enabled clients and clients that are not WPS enabled, you cannot use the WPS setup procedures to add clients that are not WPS enabled. To connect both non-WPS-enabled and WPS-enabled clients to the WNR2000 router: 1. Configure the settings of the WNR2000 router (shown in the Wireless Settings screen) for WPA-PSK or WPA2-PSK security, and record that information. See "Configuring WPA-PSK and WPA2-PSK Wireless Security" on page 2-10. When you change security settings, all existing connected wireless clients that do not share those settings are disassociated and disconnected from the router. 2. For the non-WPS-enabled devices that you wish to connect, open the networking utility, and follow the utility's instructions to enter security settings. 3. For the WPS-enabled devices that you wish to connect, follow the procedures in "Using Push 'N' Connect (Wi-Fi Protected Setup)" on page 2-13. The WNR2000 router automatically preserves the settings you configured in step 1 so all clients share the same security settings (for more information, see "Configuring the WPS Settings" on page 2-17). 2-18 v1.3, February 2009 Safeguarding Your Network
-
 1
1 -
2
-
3
-
4
-
5
-
6
-
7
-
8
-
9
-
10
-
11
-
12
-
13
-
14
-
15
-
16
-
17
-
18
-
19
-
20
-
21
-
22
-
23
-
24
-
25
-
26
-
27
-
28
-
29
-
30
-
31
-
32
-
33
-
34
-
35
-
36
-
37
-
38
-
39
-
40
-
41
-
42
-
 43
43 -
 44
44 -
 45
45 -
 46
46 -
 47
47 -
 48
48 -
 49
49 -
 50
50 -
 51
51 -
 52
52 -
 53
53 -
54
-
55
-
56
-
57
-
58
-
59
-
60
-
61
-
62
-
63
-
64
-
65
-
66
-
67
-
68
-
69
-
70
-
71
-
72
-
73
-
74
-
75
-
76
-
77
-
78
-
79
-
80
-
81
-
82
-
83
-
84
-
85
-
86
-
87
-
88
-
89
-
90
-
91
-
92
-
93
-
94
-
95
-
96
-
97
-
98
-
99
-
100
-
101
-
102
-
103
-
104
-
105
-
106
-
107
-
108
-
109
-
110
-
111
-
112
-
113
-
114
-
115
-
116
-
117
-
118
-
119
-
120
-
121
-
122
-
123
-
124
-
125
-
126
-
127
-
128
-
129
-
130
-
131
-
132
-
133
-
134
-
135
-
136
-
137
-
138
-
139
-
140
 |
 |
