Nikon 25203 D1H User's Manual - Page 40
STEP 3, Inserting a Memory Card
 |
UPC - 018208252039
View all Nikon 25203 manuals
Add to My Manuals
Save this manual to your list of manuals |
Page 40 highlights
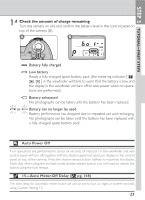
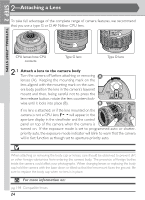
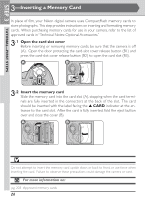
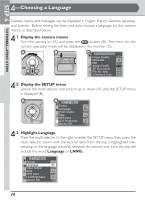
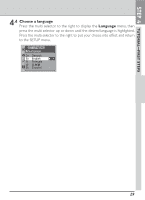
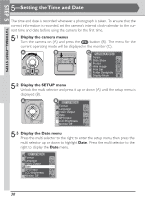
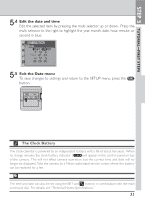
STEP 3 TUTORIAL-FIRST STEPS 3-Inserting a Memory Card In place of film, your Nikon digital camera uses CompactFlash memory cards to store photographs. This step provides instructions on inserting and formatting memory cards. When purchasing memory cards for use in your camera, refer to the list of approved cards in "Technical Notes: Optional Accessories." 3.1 Open the card slot cover Before inserting or removing memory cards, be sure that the camera is off (A). Open the door protecting the card-slot cover release button (B1) and press the card-slot cover release button (B2) to open the card slot (B3). A B 3.2 Insert the memory card Slide the memory card into the card slot (A), stopping when the card terminals are fully inser ted in the connectors at the back of the slot. The card should be inserted with the label facing the ▲ CARD indicator at the entrance to the card slot. After the card is fully inserted, fold the eject button over and close the cover (B). A B Do not attempt to insert the memory card upside down or back to front, or use force when inserting the card. Failure to observe these precautions could damage the camera or card. For more information on: pg. 203 Approved memory cards 26
-
 1
1 -
2
-
3
-
4
-
5
-
6
-
7
-
8
-
9
-
10
-
11
-
12
-
13
-
14
-
15
-
16
-
17
-
18
-
19
-
20
-
21
-
22
-
23
-
24
-
25
-
26
-
27
-
28
-
29
-
30
-
31
-
32
-
33
-
34
-
 35
35 -
 36
36 -
 37
37 -
 38
38 -
 39
39 -
 40
40 -
 41
41 -
 42
42 -
 43
43 -
 44
44 -
 45
45 -
46
-
47
-
48
-
49
-
50
-
51
-
52
-
53
-
54
-
55
-
56
-
57
-
58
-
59
-
60
-
61
-
62
-
63
-
64
-
65
-
66
-
67
-
68
-
69
-
70
-
71
-
72
-
73
-
74
-
75
-
76
-
77
-
78
-
79
-
80
-
81
-
82
-
83
-
84
-
85
-
86
-
87
-
88
-
89
-
90
-
91
-
92
-
93
-
94
-
95
-
96
-
97
-
98
-
99
-
100
-
101
-
102
-
103
-
104
-
105
-
106
-
107
-
108
-
109
-
110
-
111
-
112
-
113
-
114
-
115
-
116
-
117
-
118
-
119
-
120
-
121
-
122
-
123
-
124
-
125
-
126
-
127
-
128
-
129
-
130
-
131
-
132
-
133
-
134
-
135
-
136
-
137
-
138
-
139
-
140
-
141
-
142
-
143
-
144
-
145
-
146
-
147
-
148
-
149
-
150
-
151
-
152
-
153
-
154
-
155
-
156
-
157
-
158
-
159
-
160
-
161
-
162
-
163
-
164
-
165
-
166
-
167
-
168
-
169
-
170
-
171
-
172
-
173
-
174
-
175
-
176
-
177
-
178
-
179
-
180
-
181
-
182
-
183
-
184
-
185
-
186
-
187
-
188
-
189
-
190
-
191
-
192
-
193
-
194
-
195
-
196
-
197
-
198
-
199
-
200
-
201
-
202
-
203
-
204
-
205
-
206
-
207
-
208
-
209
-
210
-
211
-
212
-
213
-
214
-
215
-
216
-
217
-
218
-
219
-
220
-
221
-
222
-
223
-
224
-
225
-
226
-
227
-
228
-
229
-
230
-
231
-
232
-
233
-
234
-
235
-
236
-
237
-
238
 |
 |