Nikon 25203 D1H User's Manual - Page 44
STEP 5, Setting the Time and Date
 |
UPC - 018208252039
View all Nikon 25203 manuals
Add to My Manuals
Save this manual to your list of manuals |
Page 44 highlights
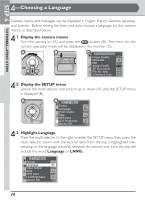
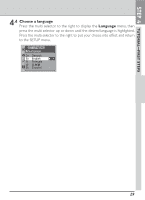
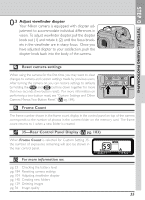
STEP 5 TUTORIAL-FIRST STEPS 5-Setting the Time and Date The time and date is recorded whenever a photograph is taken. To ensure that the correct information is recorded, set the camera's internal clock-calendar to the current time and date before using the camera for the first time. 5.1 Display the camera menus Turn the camera on (A) and press the button (B). The menu for the current operating mode will be displayed in the monitor (C). A B C PLAYBACK MENU Delete Slide Show Protect Hide Image Print Set Folder Designate D1H Display Mode 5.2 Display the SETUP menu Unlock the multi selector and press it up or down (A) until the setup menu is displayed (B). A B SET UP MENU Format - - Language En Video Output NTSC Date - - GPS Input OFF LCD Brightness 2 Monitor Off 5.3 Display the Date menu Press the multi selector to the right to enter the setup menu, then press the multi selector up or down to highlight Date. Press the multi selector to the right to display the Date menu. SET UP MENU Format - - Language En Video Output NTSC Date - - GPS Input OFF LCD Brightness 2 Monitor Off 30
-
 1
1 -
2
-
3
-
4
-
5
-
6
-
7
-
8
-
9
-
10
-
11
-
12
-
13
-
14
-
15
-
16
-
17
-
18
-
19
-
20
-
21
-
22
-
23
-
24
-
25
-
26
-
27
-
28
-
29
-
30
-
31
-
32
-
33
-
34
-
35
-
36
-
37
-
38
-
 39
39 -
 40
40 -
 41
41 -
 42
42 -
 43
43 -
 44
44 -
 45
45 -
 46
46 -
 47
47 -
 48
48 -
 49
49 -
50
-
51
-
52
-
53
-
54
-
55
-
56
-
57
-
58
-
59
-
60
-
61
-
62
-
63
-
64
-
65
-
66
-
67
-
68
-
69
-
70
-
71
-
72
-
73
-
74
-
75
-
76
-
77
-
78
-
79
-
80
-
81
-
82
-
83
-
84
-
85
-
86
-
87
-
88
-
89
-
90
-
91
-
92
-
93
-
94
-
95
-
96
-
97
-
98
-
99
-
100
-
101
-
102
-
103
-
104
-
105
-
106
-
107
-
108
-
109
-
110
-
111
-
112
-
113
-
114
-
115
-
116
-
117
-
118
-
119
-
120
-
121
-
122
-
123
-
124
-
125
-
126
-
127
-
128
-
129
-
130
-
131
-
132
-
133
-
134
-
135
-
136
-
137
-
138
-
139
-
140
-
141
-
142
-
143
-
144
-
145
-
146
-
147
-
148
-
149
-
150
-
151
-
152
-
153
-
154
-
155
-
156
-
157
-
158
-
159
-
160
-
161
-
162
-
163
-
164
-
165
-
166
-
167
-
168
-
169
-
170
-
171
-
172
-
173
-
174
-
175
-
176
-
177
-
178
-
179
-
180
-
181
-
182
-
183
-
184
-
185
-
186
-
187
-
188
-
189
-
190
-
191
-
192
-
193
-
194
-
195
-
196
-
197
-
198
-
199
-
200
-
201
-
202
-
203
-
204
-
205
-
206
-
207
-
208
-
209
-
210
-
211
-
212
-
213
-
214
-
215
-
216
-
217
-
218
-
219
-
220
-
221
-
222
-
223
-
224
-
225
-
226
-
227
-
228
-
229
-
230
-
231
-
232
-
233
-
234
-
235
-
236
-
237
-
238
 |
 |
