Nikon 25214 D70 User's Guide - Page 113
FV Lock, L / AF-L
 |
UPC - 018208252145
View all Nikon 25214 manuals
Add to My Manuals
Save this manual to your list of manuals |
Page 113 highlights
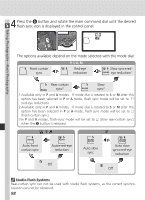
Taking Photographs-Flash Photography FV Lock This feature is used to lock flash output, allowing photographs to be recomposed without changing the flash level. This ensures that flash output is appropriate to the subject even when the subject is not positioned in the center of the frame. Flash output is adjusted automatically for any changes in sensitivity (ISO equivalency) or aperture. To use FV lock: 1 Select FV Lock for Custom Setting 15 (AEL/AF-L; 147). 15 AE-L/AF-L AE Lock only AF Lock only AE Lock hold AF-ON ? FV Lock OK 2 Rotate the mode dial to the desired setting and choose a flash sync mode as described in Steps 1-4 of "Using the Built-in Speedlight" ( 97-98). 3 Position the subject in the center of the frame and press the shutter-release button halfway to focus. 4 After confirming that the flash-ready indicator is displayed in the viewfinder, press the AE-L/ AF-L button. The built-in Speedlight will emit a monitor preflash to determine the appropriate flash level. Flash output will be locked at this level and an EL icon will be displayed in the viewfinder. 103
-
 1
1 -
2
-
3
-
4
-
5
-
6
-
7
-
8
-
9
-
10
-
11
-
12
-
13
-
14
-
15
-
16
-
17
-
18
-
19
-
20
-
21
-
22
-
23
-
24
-
25
-
26
-
27
-
28
-
29
-
30
-
31
-
32
-
33
-
34
-
35
-
36
-
37
-
38
-
39
-
40
-
41
-
42
-
43
-
44
-
45
-
46
-
47
-
48
-
49
-
50
-
51
-
52
-
53
-
54
-
55
-
56
-
57
-
58
-
59
-
60
-
61
-
62
-
63
-
64
-
65
-
66
-
67
-
68
-
69
-
70
-
71
-
72
-
73
-
74
-
75
-
76
-
77
-
78
-
79
-
80
-
81
-
82
-
83
-
84
-
85
-
86
-
87
-
88
-
89
-
90
-
91
-
92
-
93
-
94
-
95
-
96
-
97
-
98
-
99
-
100
-
101
-
102
-
103
-
104
-
105
-
106
-
107
-
 108
108 -
 109
109 -
 110
110 -
 111
111 -
 112
112 -
 113
113 -
 114
114 -
 115
115 -
 116
116 -
 117
117 -
 118
118 -
119
-
120
-
121
-
122
-
123
-
124
-
125
-
126
-
127
-
128
-
129
-
130
-
131
-
132
-
133
-
134
-
135
-
136
-
137
-
138
-
139
-
140
-
141
-
142
-
143
-
144
-
145
-
146
-
147
-
148
-
149
-
150
-
151
-
152
-
153
-
154
-
155
-
156
-
157
-
158
-
159
-
160
-
161
-
162
-
163
-
164
-
165
-
166
-
167
-
168
-
169
-
170
-
171
-
172
-
173
-
174
-
175
-
176
-
177
-
178
-
179
-
180
-
181
-
182
-
183
-
184
-
185
-
186
-
187
-
188
-
189
-
190
-
191
-
192
-
193
-
194
-
195
-
196
-
197
-
198
-
199
-
200
-
201
-
202
-
203
-
204
-
205
-
206
-
207
-
208
-
209
-
210
-
211
-
212
-
213
-
214
-
215
-
216
-
217
-
218
 |
 |
