NordicTrack 4200r Treadmill User Manual - Page 6
Assembly, Warning
 |
View all NordicTrack 4200r Treadmill manuals
Add to My Manuals
Save this manual to your list of manuals |
Page 6 highlights
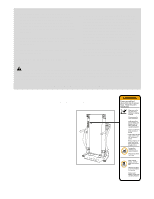
ASSEMBLY Assembly requires two people. Set the treadmill in a cleared area and remove all packing materials. Do not dispose of the packing materials until assembly is completed. Assembly requires the included allen wrench and your own flat-bladed screwdriver , wire cutters , and adjustable spanner . Note: The underside of the treadmill walking belt is coated with high-performance lubricant. During shipping, a small amount of lubricant may be transferred to the top of the treadmill or the shipping carton. This is a normal condition and does not affect treadmill performance. If there is lubricant on top of the walking belt or foot pads, simply wipe off the lubricant with a soft cloth and a mild, non-abrasive cleaner. WARNING: Do not plug in the power 1 cord until the treadmill is completely assembled. 1. Slide the treadmill out of the box. Insert the three Cage Nuts (96) into the three indicated holes in the treadmill. 96 To insert each Cage Nut (96), first hook one side of the Cage Nut into the hole and then use a flat-bladed screw- 96 driver to press the other side into the hole, as shown. 2. With the help of a second person, carefully raise both Uprights (99) to a vertical position. Press the Latch Knob Sleeve (111) into the left Upright and hold the Latch Knob Spacer (112) against the left Upright. Remove the Latch Knob (113) from the Latch Pin (107). Make sure that the Latch Pin Collar (109) and the Spring (110) are on the Latch Pin. (Note: If there are two Latch Pin Collars, place one on each side of the Spring.) Insert the Latch Pin into the Latch Knob Sleeve (111) and the Left Upright (99). Tighten the Latch Knob (113) onto the Latch Pin (107). 3. With the help of a second person, raise the Walking Platform (24) to the storage position and make sure that the latch pin is engaged as described on page 25. Position the Base Plate (91) on the treadmill as shown. Attach the Base Plate with the three Base Plate Screws (92). Note: It may be helpful if a second person tips the treadmill slightly as you tighten the Screws. If the treadmill rocks slightly, turn one or both of the Levelling Feet (127) under the Uprights (99) until the rocking motion is eliminated. Carefully lower the Walking Platform (24) to the floor as described on page 26. 6 2 99 113 112 110 107 111 109 3 24 92 127 91 99 127
-
 1
1 -
 2
2 -
 3
3 -
 4
4 -
 5
5 -
 6
6 -
 7
7 -
 8
8 -
 9
9 -
 10
10 -
 11
11 -
 12
12 -
13
-
14
-
15
-
16
-
17
-
18
-
19
-
20
-
21
-
22
-
23
-
24
-
25
-
26
-
27
-
28
-
29
-
30
-
31
-
32
-
33
-
34
-
35
-
36
-
37
-
38
 |
 |
