NordicTrack Exp2000 Treadmill English Manual - Page 10
Caution
 |
View all NordicTrack Exp2000 Treadmill manuals
Add to My Manuals
Save this manual to your list of manuals |
Page 10 highlights
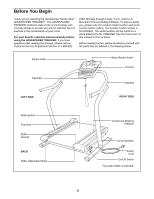
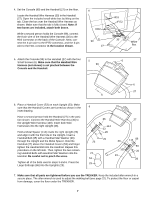
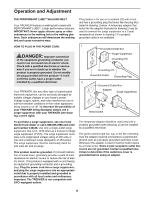
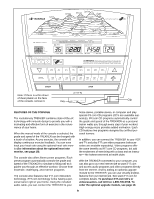
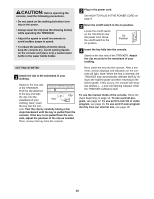
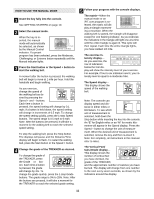
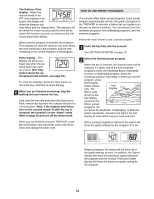
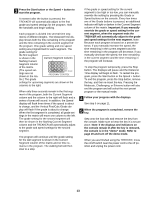
CAUTION: Before operating the console, read the following precautions. • Do not stand on the walking belt when turning on the power. • Always wear the clip (see the drawing below) while operating the TREKKER. • Adjust the speed in small increments to avoid sudden jumps in speed. • To reduce the possibility of electric shock, keep the console dry. Avoid spilling liquids on the console and place only a sealed water bottle in the water bottle holder. 2 Plug in the power cord. See HOW TO PLUG IN THE POWER CORD on page 8. 3 Move the on/off switch to the on position. Locate the on/off switch on the TREKKER near the power cord. Move the on/off switch to the on position. On Position 4 Insert the key fully into the console. Stand on the foot rails of the TREKKER. Attach the clip securely to the waistband of your clothing. GETTING STARTED 1 Attach the clip to the waistband of your clothing. Stand on the foot rails of the TREKKER. Find the clip attached to the key and slide Clip the clip onto the waistband of your Key clothing. Next, insert the key into the con- sole. Test the clip by carefully taking a few steps backward until the key is pulled from the console. If the key is not pulled from the con- sole, adjust the position of the clip as needed. Then, remove the key from the console. Next, insert the key into the console. After a moment, various displays and indicators on the console will light. Note: When the key is inserted, the TREKKER may automatically calibrate itself by rising to the highest grade and then returning to the lowest grade. If this occurs, the console will show two dashes (- -) and one flashing indicator while the TREKKER calibrates itself. To use the manual mode of the console, follow the steps beginning on page 11. To use a preset program, see page 12. To use an iFIT.com CD or video program, see page 16. To use an iFIT.com program directly from our internet site, see page 18. 10
-
 1
1 -
2
-
3
-
4
-
 5
5 -
 6
6 -
 7
7 -
 8
8 -
 9
9 -
 10
10 -
 11
11 -
 12
12 -
 13
13 -
 14
14 -
 15
15 -
16
-
17
-
18
-
19
-
20
-
21
-
22
-
23
-
24
-
25
-
26
-
27
 |
 |