NordicTrack Grt240 English Manual - Page 7
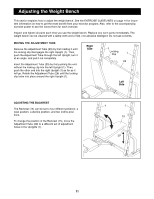
Do not overtighten the Nylon Locknuts. The Curl
 |
View all NordicTrack Grt240 manuals
Add to My Manuals
Save this manual to your list of manuals |
Page 7 highlights
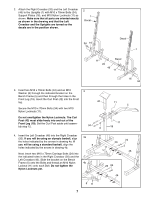
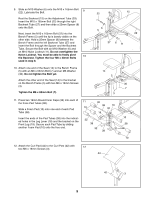
2. Attach the Right Crossbar (20) and the Left Crossbar (46) to the Uprights (1) with M10 x 70mm Bolts (34), Support Plates (16), and M10 Nylon Locknuts (11) as shown. Make sure that all parts are oriented exactly as shown in the drawing and that the Left Crossbar and the Uprights are turned so the decals are in the position shown. 2 1 Decal 34 16 Decal 1 11 Decal 20 46 11 16 34 3. Insert two M10 x 70mm Bolts (34) and an M10 3 Washer (6) through the indicated bracket on the Bench Frame (5) and then through the holes in the Front Leg (19). Insert the Curl Post (42) into the Front leg. 42 Secure the M10 x 70mm Bolts (34) with two M10 Nylon Locknuts (11). Do not overtighten the Nylon Locknuts. The Curl Post (42) must slide freely into and out of the Front Leg (19). Set the Curl Post aside until assembly step 12. 34 6 11 5 11 19 4. Insert the Left Crossbar (46) into the Right Crossbar (20). If you will be using an olympic barbell, align 4a the holes indicated by the arrows in drawing 4a. If you will be using a standard barbell, align the 5 holes indicated by the arrows in drawing 4b. Next, insert two M10 x 70mm Carriage Bolts (24) into the indicated holes in the Right Crossbar (20) and the Left Crossbar (46). Slide the bracket on the Bench Frame (5) onto the Bolts and thread an M10 Nylon 4b Locknut (11) onto each Bolt. Do not tighten the Nylon Locknuts yet. 24 20 11 46 20 24 46 5 11 7
-
 1
1 -
 2
2 -
 3
3 -
 4
4 -
 5
5 -
 6
6 -
 7
7 -
 8
8 -
 9
9 -
 10
10 -
 11
11 -
 12
12 -
13
-
14
-
15
-
16
-
17
-
18
 |
 |
